


Are you looking to harness the power of ultrasonic waves to achieve a deep clean for your delicate equipment or robust machinery? Cleaning with an ultrasonic cleaner offers a high-level of precision and efficiency for a wide array of items. In this guide, we’ll walk you through everything you need to know about selecting the right ultrasonic cleaner, optimizing the ultrasonic cleaning machine process, and maintaining your medical device well for long-lasting use. Whether you are dealing with medical implements, electronic components, or jewelry, find out how to remove contaminants effectively without damaging your items by cleaning with ultrasonic cleaner.
Key Takeaways
- Cleaning with ultrasonic cleaners use high-frequency sound waves to create cavitation bubbles for effective cleaning, valuable across multiple industries and capable of removing diverse contaminants like dust, oil, and biological soil.
- Choosing the right cleaning with ultrasonic cleaners involves considering the size, capacity, power, and frequency suitable for the items being cleaned, ensuring they are properly immersed and not overcrowded to prevent damage.
- Proper use of an ultrasonic cleaner requires disassembling items for thorough cleaning, selecting the appropriate cleaning solution based on the type of contaminants, and observing the correct operating temperature and cycle times to enhance cleaning efficiency.
Understanding Cleaning with Ultrasonic Cleaners

An ultrasonic washer or cleaner, an ultrasonic washer also known as an ultrasonic cleaning machine, is an electronic device that leverages high-frequency sound waves for effective cleaning. Its application spans across various industries including:
- Medical
- Automotive
- Aerospace
- Dental
- Electronics
- Jewellery
From medical instruments to golf clubs, cleaning with ultrasonic cleaners can clean a wide range of items.
Since their introduction in the mid-20th century, most ultrasonic cleaners, especially industrial ultrasonic cleaners, have gained popularity for precision cleaning operations and medical applications. The benefits of using the best ultrasonic cleaner are numerous: efficient and quiet cleaning, smart technology, and the ability to clean a diverse range of items.
The effectiveness of cleaning with ultrasonic cleaners in removing a variety of contaminants has led to a burgeoning market. Ultrasonic cleaners can remove:
- Dust
- Oil
- Rust
- Wax
- Biological soil
The market for ultrasonic cleaners is projected to reach $738.1 million by 2027.
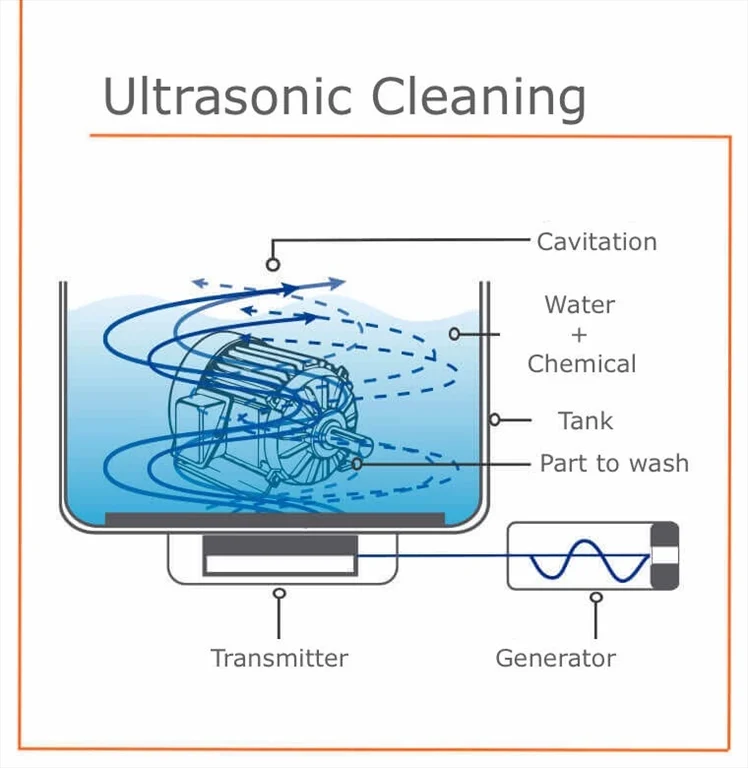
High-Frequency Sound Waves
High-frequency sound waves, inaudible to the human ear, are utilized in ultrasonic cleaning. These sound waves are produced by a transducer that oscillates in response to an electrical signal, generating ultrasonic energy. The resulting ultrasonic energy and vibrations create vacuum bubbles responsible for the cleaning process.
These waves alternately expand and compress, generating microscopic bubbles. When these tiny bubbles then implode, they cause a non-abrasive scrubbing action that dislodges contaminants from the surfaces of the items being cleaned.
Cavitation Bubbles
Ultrasonic cavitation bubbles are the primary cleaning agents in the ultrasonic cleaning process. They form and implode with force, effectively dislodging contaminants from surfaces. The frequency of an ultrasonic cleaner dictates the size of these bubbles, with lower frequencies creating larger, more aggressive bubbles suited for robust parts, and higher frequencies generating smaller bubbles for delicate items.
Optimal gas supersaturation in the cleaning solution enhances the efficiency of cavitation in removing particles, allowing low-intensity ultrasound to clean surfaces effectively without causing erosion. These bubbles are capable of removing contaminants without the necessity of harsh chemicals.
Choosing the Right Ultrasonic Cleaner
Several factors should be considered when choosing an ultrasonic cleaner. The size and quantity of the components you’ll be cleaning, as well as the required working depth of the cleaning fluid, are essential considerations.
Avoiding overcrowding the cleaner is also essential. Placing too many items at once can cause surfaces and small parts to rub against each other, leading to scratches and damage.
Size and Capacity
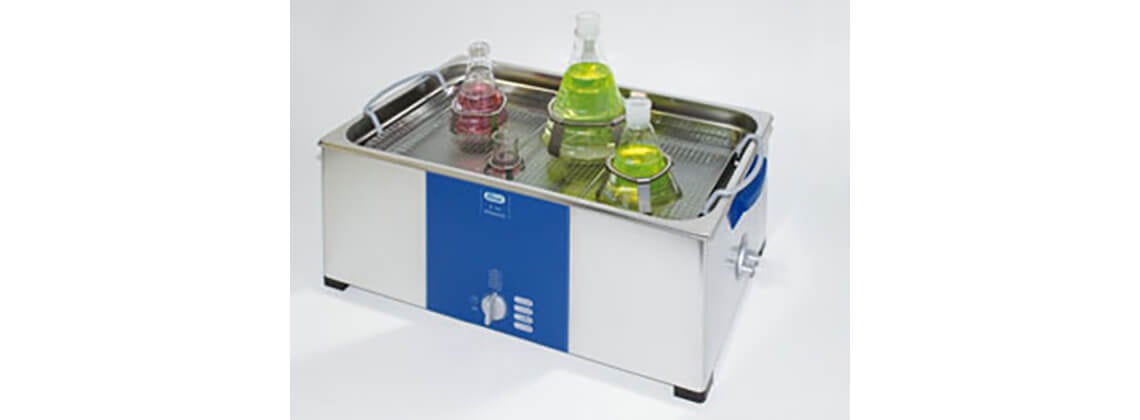
The dimensions of ultrasonic cleaner tanks vary to accommodate different items. For effective cleaning, items must be fully immersed in the cleaning solution and should not touch the sides or bottom of the ultrasonic bath tank.
Using cleaning baskets can help maintain proper immersion and spacing general cleaning well, especially for varied part sizes. The ‘working depth’ of a tank is the distance from the bottom of the cleaning liquid basket to the surface of the cleaning solution, which helps determine the correct fluid level for effective cleaning.
For non-standard items, custom-sized tanks may be required.
Power and Frequency
The cleaning efficiency of your ultrasonic cleaner is significantly influenced by its power and ultrasonic frequency. Lower frequencies, ranging from 20-25 kHz, are ideal for cleaning large parts like automotive materials due to their lower frequency and their aggressive cleaning action. On the other hand, higher frequencies improve the ability of waves to reach small holes and crevices, making them suitable for cleaning sensitive and delicate objects.
Ultrasonic power is an electrical energy, measured in watts per gallon or liter of cleaning solution, typically between 50 to 100 watts per gallon. An increase in power leads to a greater number of cavitation bubbles and a quicker cleaning process. However, too much power can be wasteful and potentially harm the items being cleaned.
Some cleaners have a sweep mode feature that varies frequencies to avoid standing waves and ensure a more consistent cleaning. The pulse mode can temporarily boost cleaning power to dislodge stubborn contaminants, enhancing the overall cleaning effectiveness. Choosing the right combination of power and frequency is crucial to achieve the best cleaning results without causing damage to the parts.
Preparing Items for Ultrasonic Cleaning

Some preparation is required before placing your items in the ultrasonic cleaner for cleaning with ultrasonic cleaners. Disassemble items as much as possible to ensure thorough cleaning. Any heavy dirt or debris should be manually removed from the items before placing them in the ultrasonic cleaner.
The use of friction and brushes can be crucial for removing soil from fragile instruments before ultrasonic cleaning. Always use a basket to maintain the optimum position in the tank during ultrasonic cleaning tank and to prevent contact with the tank surface, which can cause wear and potential leaks.
Disassembly and Pre-Cleaning
Significant improvement in cleaning efficiency can be achieved by disassembling your items as much as possible by allowing ultrasonic waves to reach more surfaces. Fluidics can effectively remove debris from internal channels before ultrasonic cleaning, serving as an efficient pre-cleaning step.
However, Pre-cleaning is crucial to prevent inorganic and organic materials from interfering with the ultrasonic cleaning process. For heavily soiled items, pre-soaking in a strong cleaning solution followed by ultrasonic cleaning at a high temperature can enhance cleanliness.
Positioning Items in the Tank
To ensure effective cleaning, items must be properly positioned in the tank. Resting items on the bottom of the tank can prevent cavitation from taking place on the part of the object not in contact with the solvent. Using a basket can prevent this issue and avoid potential damage from vibrations.
Items should not touch the sides of the tank, which can dampen the ultrasonic effect. Moreover, they should be separated to improve cleaning results and avoid damage due to vibration. Stacking of instruments should be avoided to ensure effective cleaning. Arrange items to avoid shadowing, where one item blocks the ultrasonic waves from reaching another item, hindering the cleaning process. The positioning should allow the ultrasonic waves to circulate freely around the items.
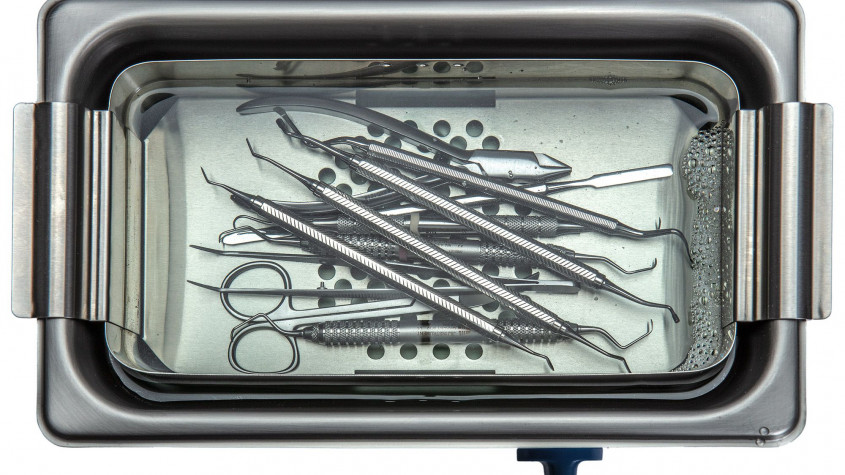
Hinged instruments should be opened fully to allow adequate contact with the cleaning solution.
Selecting the Ideal Cleaning Solution
Just as choosing the right ultrasonic cleaner is vital, so is selecting the right cleaning solution for cleaning with ultrasonic cleaners. Ultrasonic cleaning uses water-based or solvent-based cleaning solutions, often infused with detergents and other components to enhance cleaning efficacy. The cleaning solution’s chemistry should be selected based on its ability to remove specific contaminants. Some common types of ultrasonic cleaning work and solutions include:
- Alkaline solutions: used for greases and carbon
- Caustic cleaners: used for rust and strongly adhered contaminants
- Enzymatic solutions: used for organic matter
The type of materials and contaminants should also be considered, as some cleaners can damage sensitive materials.
After the cleaning solution diminishes in effectiveness, it should be replaced, and the tank should be cleaned as per the manufacturer’s guidelines before refilling with a newly degassed solution.
Water-Based vs. Solvent-Based Solutions
Water-based ultrasonic cleaning solutions are commonly used for challenging soils such as baked-on flux residues, dirt or heavy industrial greases, especially when used with ultrasonic agitation. Being environmentally friendly, they possess zero global warming potential and low volatile organic compounds. However, they typically require a rinse step due to residues that do not evaporate with water.
On the other hand, solvent-based cleaners can effectively clean a broad array of soils and may require less time for cleaning, though they are less environmentally friendly compared to water-based solutions. They can evaporate without leaving residue, making the rinse step usually optional. However, they may leave behind cross-contaminating residue as more soil is dissolved into the solvent.
Adding Wetting Agents and Detergents
To enhance cleaning action, wetting agents, such as Kodak Photo-Flo and Ilford Ilfotol, are often added to ultrasonic cleaning solutions. They help form a continuous, homogeneous film of the cleaning fluid, enabling it to penetrate into small crevices and assist cavitating bubbles in cleaning more effectively.
Enzymatic detergents can be especially useful when dealing with medical instruments, as they help dissolve proteins and other organic materials. In ultrasonic cleaning, enzymatic solutions accelerate the removal of organic matter due to enzymatic action. The variety of detergents available can be geared towards different strengths and safety profiles, providing enhanced cleaning of various soils and contaminants.
Adding surfactants to water-based cleaning solutions reduces the surface tension of water, thereby improving the water based solution used’s ability to clean tight spaces more effectively.
Operating Your Ultrasonic Cleaner
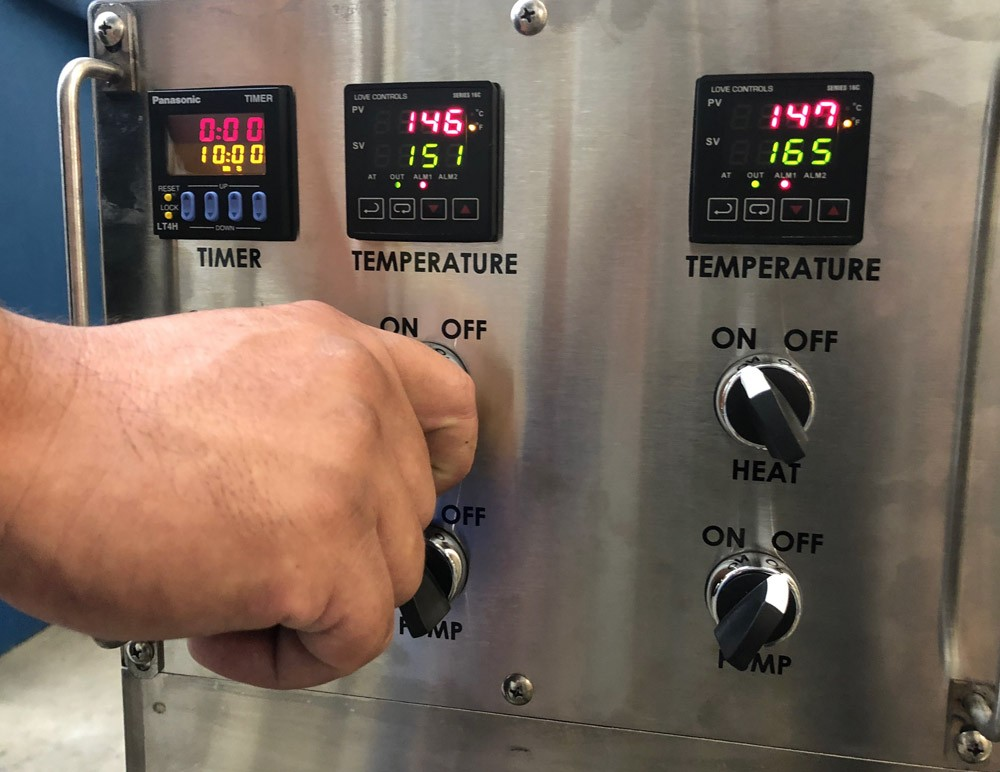

The operation of an ultrasonic cleaner is straightforward. The recommended temperature for cleaning lightly soiled objects is 40°C, while a temperature between 40°C and 60°C may be required for a deeper cleaning of parts. Ultrasonic cleaners feature different cleaning modes such as degas, delicate, and full, where delicate mode provides a gentler clean at halved power for sensitive materials, and variable power or pulse modes can be applied for stubborn contaminants.
For lightly soiled items, the recommended cleaning time in an ultrasonic cleaner is between 2 to 10 minutes. Furthermore, ensure the ultrasonic cleaner’s tank is filled to the indicated level with water and cleaning solution, avoiding both overfilling and underfilling, which can prevent proper function and potentially damage the ultrasonic cleaner’s work tank. This is a tremendous help in cleaning with ultrasonic cleaners.
Setting the Temperature
For precise cleaning and to prevent damage to soft materials, setting the ideal temperature is critical. The theoretical optimal temperature for ultrasonic cavitation is around 70°C, although this can vary with detergent concentration. A commonly selected temperature range is between 55°C and 60°C.
Lower temperatures should be used for cleaning materials that may soften or degrade at higher temperatures, such as plastics. Ambient or cold temperatures can be utilized for cleaning but will usually require a longer cleaning time. Raising the temperature generally increases the cleaning speed. Here are some guidelines:
- Every 10°C increase potentially doubles the speed of the ultrasonic cleaning process.
- For optimal cleaning, consider the material being cleaned and its temperature tolerance.
- Use caution when cleaning delicate or heat-sensitive items.
Higher temperatures achieved by supersaturating the cleaning solution with dissolved oxygen can result in more cavitation bubbles and intensified streaming flow, thus enhancing cleaning efficiency.
Adjusting the Timer and Cleaning Cycle
It is crucial to adjust the timer of the ultrasonic cleaner based on the level of contamination. Here are some recommendations:
- Longer cycles are recommended for heavily soiled items.
- Shorter cycles are recommended for lightly soiled items.
- For delicate items or those with intricate geometries, consider using multiple short cycles to ensure thorough cleaning without causing damage.
To achieve consistent results within a professional setting, employ predefined and tested cycle times that are tailored for particular items or material types. When cleaning diverse items together, identify a cycle time that effectively cleans all of them while minimizing the risk of harming more delicate objects.
Caring for Your Ultrasonic Cleaner
The care for cleaning with ultrasonic cleaners holds as much importance as its operation. Do not use metal brushes or abrasive scrubbers when cleaning the tank as they can damage the stainless steel surface. Always ensure that the device is completely unplugged and disconnected from the other power supply or source before performing any maintenance or cleaning tasks.
When changing cleaning solutions, follow these steps:
- Clean the tank to remove sediments and deposits, avoiding abrasive cleansers and following the instruction manual’s recommendations.
- Store ultrasonic cleaners with the lid on to prevent dust and other contaminants from getting into the tank.
- After the cleaning is done, unplug the ultrasonic cleaner’s wall unit to ensure electrical safety.
Regular Cleaning and Maintenance
The lifespan and optimal performance of your ultrasonic cleaner can be prolonged through regular cleaning and maintenance. A routine visual inspection should be conducted to check for wear or damage in the tank. Maintaining a log that records all maintenance activities, including fluid changes and general cleanings, promotes accountability and ensures a consistent maintenance schedule.
Using cleaning baskets prevents parts from coming into contact with grease at the bottom of the tank, avoiding damage due to vibration over time. Lime deposits within the cleaner’s tank can be effectively removed using a dedicated cleaning solution, followed by thorough rinsing and drying. Regularly checking and cleaning the cooling fan filters is crucial to preventing overheating of the ultrasonic cleaner.
Proper Storage
Your ultrasonic cleaner can be protected from damage and its functionality maintained through proper storage. Ensure the tank is empty and dry when storing the cleaner to prevent corrosion or damage. Store the cleaner in a dry, cool place to safeguard against damage from moisture and extreme temperatures.
To properly care for your cleaner, follow these steps:
- Cover the cleaner when not in use to protect it from dust and other contaminants.
- For extended periods of non-use, follow the manufacturer’s instructions for long-term storage, which may include steps to prevent internal corrosion.
- If available, use the cleaner’s original packaging for storage as it is designed to offer protection from physical damage.
Summary
This comprehensive guide walks you through the world of ultrasonic cleaners, explaining how they work and their benefits. You will learn about selecting the perfect ultrasonic cleaner for your specific needs and requirements. Moreover, preparing items for cleaning is crucial, and this guide provides detailed instructions on the process. Choosing the ideal cleaning solution for ultrasonic cleaners ensures effective and efficient cleaning results.
Finally, the guide covers essential tips for using, maintaining, and storing your ultrasonic cleaner properly. With proper knowledge and precautions, ultrasonic cleaners can provide an excellent cleaning solution for a wide range of items, enhancing cleanliness and prolonging the lifespan of your items.
Certified MTP offers a full line of Ultrasonic Sieve Cleaner Machines, Ultrasonic Cleaners and Baths, and Sieve Accessories.
Frequently Asked Questions
What cannot be used in cleaning with ultrasonic cleaners?
When you are cleaning with ultrasonic cleaners, some electronic equipment and components, such as MEMS devices like gyroscopes, accelerometers, and microphones, can be damaged or destroyed by the high-intensity vibrations of ultrasonic cleaning. Be cautious when cleaning such items.
What liquid do you use in an ultrasonic cleaner?
In an ultrasonic cleaner, you can use deionized water as a liquid for cleaning, which is safe for most materials. Adding detergent is optional and not always necessary.
What do you clean with an ultrasonic cleaner?
You can clean a wide range of materials with an ultrasonic cleaner, including metals, glass, rubber, ceramics, hard plastics, industrial and automotive parts, jewelry, lenses, watches, dental instruments, and more, making it a versatile cleaning tool.
Do ultrasonic cleaners really work?
Yes, ultrasonic cleaners are a highly effective professional cleaning method that has been around for 60 years. They can remove soils, contaminants, debris, and grime from various materials.
What is an ultrasonic cleaner?
An ultrasonic cleaner is an ultrasonic cleaner operates an electronic device that uses high-frequency sound waves to clean objects and is widely used across numerous industries.


