
The concrete slump test is one of the most widely used field tests in construction. It provides a quick and practical way to measure the workability and consistency of freshly mixed concrete before placement. When performed correctly, the slump test helps field technicians verify that the concrete meets project specifications and is suitable for proper placement and compaction.
This guide explains how to perform a concrete slump test correctly, step by step, while highlighting best practices, common mistakes, and proper interpretation of results. Whether you’re new to field testing or refreshing your knowledge, this guide focuses on accuracy, consistency, and standard-compliant testing.
What Is a Concrete Slump Test?
A concrete slump test measures how much freshly mixed concrete settles (or “slumps”) when the mold is removed. The amount of slump indicates the workability of the concrete, which directly affects placement, finishing, and overall performance.
The test is commonly used for:
- Ready-mix deliveries
- Jobsite quality control
- Verifying mix consistency
- Identifying water-content issues
Slump testing is performed using standardized slump test equipment, which ensures repeatable and reliable results across different job sites.
Why Slump Testing Is Important in the Field
Concrete that is too stiff can be difficult to place and consolidate, while overly wet concrete may lead to segregation, reduced strength, and durability issues. Slump testing helps technicians identify these issues before placement.
Key benefits of proper slump testing include:
- Early detection of mix inconsistencies
- Improved placement and finishing quality
- Reduced risk of rejected loads
- Better compliance with project specifications
Using properly maintained concrete testing equipment helps ensure results are accurate and defensible during inspections.
Equipment Required for a Concrete Slump Test
Before starting the test, make sure all required equipment is clean, undamaged, and placed on a stable surface.
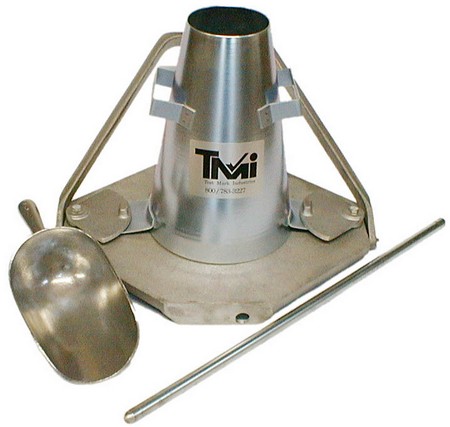
Essential equipment includes:
- Slump cone (standard mold)
- Rigid base plate
- Tamping rod
- Measuring scale or ruler
A complete slump test kit ensures all components meet ASTM requirements and work together correctly.

Step-by-Step Procedure for Performing a Concrete Slump Test
Step 1: Prepare the Testing Area
Choose a firm, level, and non-absorbent surface. The base plate must remain stable throughout the test to prevent inaccurate readings.
Before testing:
- Dampen the slump cone and base plate
- Remove standing water
- Place the cone firmly on the base plate
Ensuring stability at this stage prevents uneven settlement during the test.
Step 2: Fill the Slump Cone in Three Layers
Fill the slump cone in three equal layers by volume.
For each layer:
- Add concrete evenly around the cone
- Avoid excessive vibration
- Keep the cone steady
Each layer must be properly compacted using a standard tamping rod to remove air voids and ensure uniform density.
https://certifiedmtp.com/tamping-rods/
Step 3: Rod Each Layer Correctly
Rodding is critical for achieving accurate slump results.
Rodding guidelines:
- Rod each layer exactly 25 times
- Distribute strokes evenly across the surface
- Penetrate slightly into the layer below (except for the first layer)
Improper rodding can result in misleading slump values, either too high or too low.
Step 4: Strike Off the Surface
After filling and rodding the final layer:
- Strike off excess concrete using the tamping rod
- Ensure the concrete is level with the top of the cone
- Clean any spilled concrete from around the base
This step ensures the volume of concrete inside the cone is consistent for every test.
Step 5: Lift the Slump Cone Vertically
Carefully lift the cone straight upward in a slow, steady motion.
Important reminders:
- Do not twist or tilt the cone
- Lift within 5–10 seconds
- Keep the cone aligned vertically
Improper lifting is one of the most common causes of inaccurate slump measurements.
Step 6: Measure the Slump
Immediately measure the slump by placing the cone next to the slumped concrete.
To measure:
- Place the tamping rod across the top of the cone
- Measure the vertical distance from the rod to the highest point of the slumped concrete
- Record the measurement to the nearest ¼ inch (or 5 mm)
This value represents the concrete slump.
Types of Slump and What They Indicate
Not all slumps look the same. Observing the shape of the concrete after lifting the cone provides additional insight into mix quality.
True Slump
- Concrete settles evenly
- Indicates uniform mix and proper consistency
- Valid test result
Shear Slump
- One side shears off
- May indicate poor cohesion or segregation
- Test should be repeated
Collapse Slump
- Concrete collapses completely
- Indicates overly wet mix
- Result may be invalid
Understanding these differences helps technicians identify potential mix problems before placement.
Recommended Slump Ranges (General Guidance)
While project specifications should always take priority, typical slump ranges include:
- Low workability: 25–50 mm (1–2 inches)
- Medium workability: 50–100 mm (2–4 inches)
- High workability: 100–175 mm (4–7 inches)
Slump requirements vary based on application, placement method, and structural design.
Common Mistakes to Avoid During Slump Testing
Even small errors can significantly impact test accuracy. Avoid these common mistakes:
- Uneven or unstable base surface
- Incorrect rodding technique
- Lifting the cone too quickly or unevenly
- Using damaged or deformed equipment
- Delaying measurement after cone removal
Regular inspection and proper handling of slump testing equipment help minimize these issues.
Equipment Care and Maintenance
Proper care ensures consistent performance and long-term accuracy.
Best practices include:
- Cleaning equipment immediately after use
- Storing tools in a dry environment
- Checking cones for dents or deformation
- Replacing worn tamping rods
Maintained equipment supports reliable field results and smoother inspections

When Slump Testing May Not Be Sufficient
While slump testing is valuable, it does not measure:
- Concrete strength
- Air content
- Long-term durability
For a complete evaluation, slump testing is often combined with other concrete testing methods, depending on project requirements.
Final Thoughts
Performing a concrete slump test correctly is essential for ensuring consistent, workable concrete in the field. By following standardized procedures, using proper equipment, and understanding how to interpret results, field technicians can identify potential issues before they impact construction quality.
Accurate slump testing supports better placement, fewer rejected loads, and improved overall project outcomes. Consistency, attention to detail, and proper technique are the keys to reliable results.