


Understanding the slump concrete test is critical for anyone involved in concrete construction, as it directly affects a whole construction project’s integrity. This test measures the consistency of fresh concrete, a key indicator of its workability and eventual strength. In this article, we will explore the essential elements of the slump concrete test and how to execute it for reliable results.
Key Takeaways
- The concrete slump test assesses the consistency and workability of concrete before it sets, with the slump cone being a vital instrument for measuring the mixture’s fluidity, which greatly influences its strength, durability, and appearance.
- Proper setup and execution of the slump test, including choosing the right environment and preparation of clean and damp equipment, are fundamental for accurate results, which are measured after filling, compacting, and lifting the cone correctly.
- Interpreting the slump test results requires an understanding of true slump and identifying shear and collapse slumps, which are critical for evaluating the mixture’s workability, with international standards (like ASTM, AASHTO, and EN norms) ensuring uniform testing procedures.
Demystifying the Concrete Slump Test


The concrete slump test is a pivotal tool in the construction industry. This test, also known as concrete slump test measures, assesses the consistency and workability of fresh concrete prior to setting, determining whether the mixture is excessively fluid or lacks fluidity. The concrete slump testing cone test is central to this test, aiding in evaluating the mix’s workability.
We’ll now examine the importance of measuring slump in concrete and the crucial function of the slump cone.
The Essence of Measuring Slump in Concrete
The measurement of slump in concrete is integral to construction. It provides insight into the flow characteristics and ability to be shaped and molded effectively, which is particularly crucial for normal reinforced concrete. The slump test has a significant impact on the overall performance of concrete. It can affect factors such as strength, durability, and appearance..
Furthermore, the test plays a critical role in evaluating the water content of concrete, detecting potential issues related to excess concrete caused by excessive or insufficient water in the mix.
Examining the Role of the Slump Cone
The slump cone is a pivotal instrument in the slump test. Its standardized dimensions of 100mm top diameter, 200mm bottom diameter, and 300mm height are crucial in ensuring precise and consistent results when measuring the workability and consistency of concrete. The cone’s design, though not directly impacting the test outcomes, establishes a standardized approach to guarantee consistent and precise measurements.
Setting Up for the Slump Test

Preparing for the slump test is a vital part of the process. It involves selecting a suitable environment and preparing the equipment, which includes a slump cone, a bottom base plate, and a tamping steel rod itself.
The test should ideally be conducted at the point of discharge or placement to guarantee precise results. We’ll now discuss the selection of an appropriate environment and the preparation of equipment for the slump test.
Choosing the Right Environment
The environment for a slump test plays a significant role in the accuracy of the results. Factors such as temperature and humidity are substantial influencers, affecting the workability and consistency of the concrete.
It is also important to conduct the test on a level or flat surface to guarantee consistent compaction and uniformity of the concrete sample.
Preparing the Equipment
The preparation of equipment for the slump test is just as important as selecting a suitable environment. The equipment, including the slump cone and base plate, should be clean and free from any debris or residues.
Dampening the equipment prior to the test is essential to reduce surface friction, which can impact the flow of concrete and consequently affect the precision of the results.
The Step-by-Step Guide to the Slump Test Procedure
Performing a slump test involves a set of three stages and step-by-step procedures, each crucial to obtaining accurate results. The test begins with filling and compacting the cone, then lifting it vertically, and finally, recording the various slump values therein.
We’ll break down these steps in detail, beginning with the filling and compaction of the cone.
Filling and Compacting the Cone
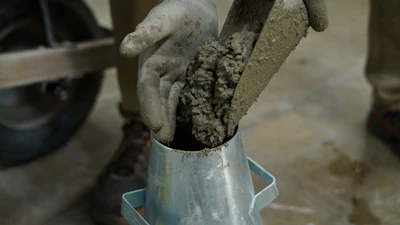

The first step in the slump test is filling and compacting the cone. The cone should be filled in three equal layers, and the internal surface of each layer should be compacted with 25 strokes of a steel tamping rod, distributed evenly throughout the mass.
Correct compaction is key to achieving uniformity and consistency, both of which are essential for accurate slump test results.
The Critical Moment: Lifting the Cone Vertically
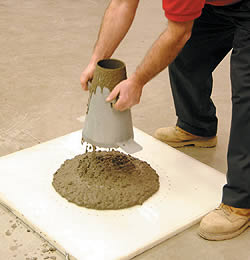

After filling and compacting the cone, the next critical step is to ready mixed concrete by lifting the cone vertically. The cone should be only lifted vertically, in a vertical, slow, and steady upward motion, without any rotational or lateral movements. This procedure is important as it enables the concrete to slump freely without disturbances, which could impact the test results.
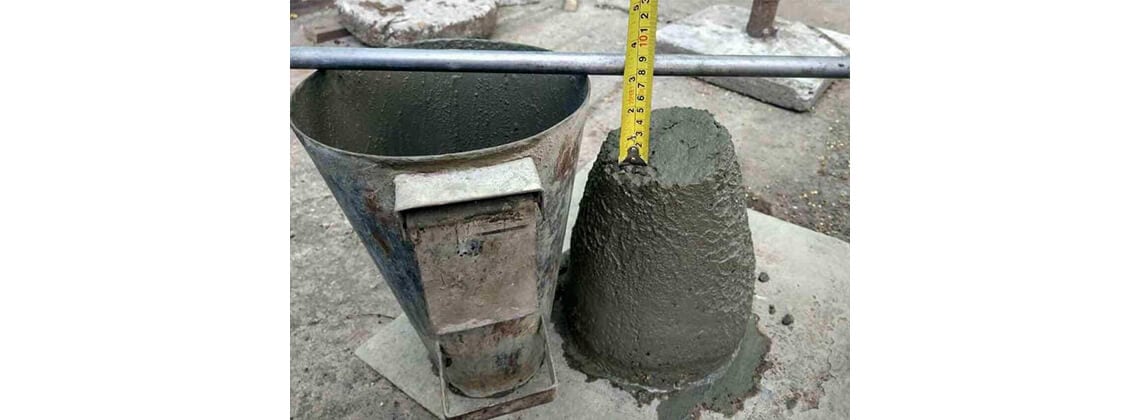
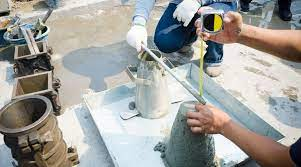
Recording Slump Values
The final step in the slump test is recording the slump values. The slump values are recorded by measuring the distance of the slumped concrete from the top of the cone to the displaced center point on top of the sample.
Precise recording of slump values is significant as it aids in determining the flowability and consistency of the concrete.
Interpreting the Results of a Slump Test
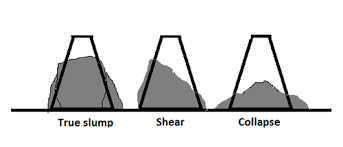

Once the slump values are recorded, interpreting the results becomes the next crucial step. Understanding the true slump and recognizing shear and collapse slumps can provide a wealth of information about the workability and consistency of the concrete mix.
We’ll now examine the concept of true slump and the recognition of shear and collapse slumps in more depth.
Understanding True Slump
True slump in concrete occurs when the material subsides briefly and largely retains its molded shape, reflecting the consistency and workability of freshly mixed concrete. It is a critical factor in concrete mix design as it offers valuable insights into the workability and performance of the concrete in construction projects.
Recognizing Shear and Collapse Slumps
Shear slump and collapse slumps are two types of insufficient slumps identified in concrete slump testing. While shear slump is a result of insufficient cohesion in three layers of the concrete, causing an uneven shear off and collapse to one side, collapse slump typically indicates that the mix is too wet, with excessive water content. These types of slumps indicate potential issues with the concrete mix and may require adjustments or further testing.
Navigating International Standards in Slump Testing
Slump testing isn’t just a local affair. It’s governed by international standards, which include ASTM and AASHTO specifications in the United States and European norms. These standards ensure that the test procedures and equipment used are uniformly accurate and reliable across borders.
We’ll now examine these standards more closely.
Adhering to ASTM and AASHTO Specifications
In the United States, the ASTM and AASHTO specifications provide the benchmark for slump test procedures and equipment. These guidelines have had a significant impact on concrete testing in the United States by offering extensive guidelines and test methods to uphold the same quality control, safety, and uniformity of materials and practices, which includes detailed specifications for the slump test.
Compliance with European Norms
Meanwhile, in Europe, the slump test is governed by the EN 12350-2 norm. This European standard outlines the process for evaluating the consistency of fresh concrete. Its meticulous procedures and responsiveness to variations in concrete consistency guarantee the reliability of slump test results.
Alternatives to the Traditional Slump Test
While the traditional slump test is widely used, there are alternative methods for evaluating concrete workability, such as the K Slump Test and the British Compacting Factor Test. These tests offer different insights into concrete workability and can be used as complements to the traditional slump test.
We’ll now examine these alternative methods.
Discovering the K Slump Test
The K Slump Test is a simple and quick method for assessing concrete workability. Instead of using a traditional slump cone, the K Slump Test uses a modified cone and indicator to measure slump.
This test is commonly utilized to assess the slump and workability of fresh concrete.
The British Compacting Factor Test
On the other side of the Atlantic, the British Compacting Factor Test measures the workability of concrete by comparing density before and after compaction. This test is particularly useful for concrete mixes with low slump values, providing valuable information on compaction, strength, and durability.
Addressing Common Slump Concrete Test Challenges
Like any procedure, conducting a slump concrete test, including the zero slump scenario, comes with its own set of challenges. These may include ensuring representative concrete samples and preventing and overcoming surface friction. However, with careful planning and adherence to recommended procedures, these challenges can be addressed effectively.
We’ll now look into guaranteeing representative concrete samples and mitigating surface friction.
Ensuring Representative Concrete Samples
Ensuring that the concrete sample is a true representation of the entire batch is critical to obtaining accurate slump test results. It is advisable to take samples prior to any finishing procedures and to ensure that the sample is obtained within 5 minutes.
Preventing and Overcoming Surface Friction
Surface friction can significantly impact the flow of concrete, thereby influencing the workability measurement in the slump cone height and test. To mitigate this, it’s crucial to clean and lubricate the slump cone, base plate, and tamping steel rod before each test.
Summary
The slump concrete test is an indispensable tool in the construction industry, playing a crucial role in assessing the workability and consistency of fresh concrete. By following meticulous procedures, interpreting results accurately, and adhering to international standards, the slump test ensures the performance and durability of concrete across construction projects.
Certified MTP has the largest selection of concrete testing supplies, showcasing industry-leading brands for Slump Cones, Concrete Air Entrainment Meters, slump testers, Concrete Test Cylinder Molds, and fresh concrete testing equipment. We also offer the largest selection of tamping rods for concrete tests.
Frequently Asked Questions
What does a slump concrete test tell you?
A slump concrete test tells you about the consistency of a concrete batch and helps identify mix defects before pouring on a road construction project or site, ensuring the quality of the concrete.
What is a good slump concrete test?
A good slump for concrete is 4 to 5 inches, as this consistency is ideal for most exterior decorative applications. Avoid slumps greater than 5 inches to prevent a weak and porous surface.
What does 80 slump mean in concrete?
A slump of 80 in concrete means that the mix has very high fluidity and a high workability too, making it easier to pour right mix and shape. This indicates that the concrete will flow easily into formwork and around reinforcement.
What is the standard slump concrete test?
The standard slump concrete test for concrete involves filling a cone excess concrete in three lifts, rodding each one 25 times through the lift depth, without tapping the straight edge of the cone. Each lift should fill a third of the volume.
How is the slump cone used in the slump test?
The slump cone is used to measure the consistency of fresh concrete by filling it in layers, compacting each layer, then using hydraulic cement concrete, lifting the cone vertically to allow the concrete to slump, and measuring the slump value. This test helps determine the workability of the concrete.
Related Blogs for Slump Concrete Test:
Uncovering the Best Slump Cone: A Comprehensive Guide
Understanding the Slump Tester & Its Uses
Slump Test of Concrete: A Comprehensive Guide
Slump Test Table: Measure Workability of Concrete
Tampering Rod for Concrete Slump and Cylinder Mold Tests
Slump Test: Measuring the Consistency of Fresh Concrete
Concrete Slump: What Is It and Why Does it Matter?
Finding the Workability of Concrete with the Slump Test
How to Perform a Slump Test of Concrete: Steps and Results
Consistency of Concrete; How It’s Measured, Why It’s Important, and Relation to Workability
The Proper Pressure with Certified Concrete Testing Products
Materials Testing Experts Explain The Importance Of Concrete Testing
Mastering K Tester: Accurate Concrete Slump Measurements
Tamping Rod: Find the Perfect Fit for Your Concrete Testing
Choosing the Right Concrete Scoop for Reliable Slump Tests
Guide to Slump Test Concrete: Methods, Tips & Significance
Flow Test of Concrete: Unlocking Workability Wonders
Slump Concrete Meaning: Consistency & Quality Control
ASTM C 143 Slump Test: Mastering Concrete Consistency
Metric System: A Guide to Units & Conversions
Tamping Rod for Concrete: Guide to Best Applications
Initial Set Time of Concrete: Key Factors & Practical Tips
How to Calculate Unit Weight Concrete in 2023
Determining Unit Weight of Concrete for Accurate Measurement


