


Grout molds are essential in the world of cement and mortar testing. These seemingly simple devices play an integral role in determining the strength and durability of various construction materials. In this blog post, we’ll dive deep into the world of grout molds, exploring their types, features, and applications, along with tips for selecting the right mold for your specific needs. Get ready to become a grout mold expert!
Key Takeaways
- Grout molds are used to form standardized samples for quality control and reliable testing.
- Adherence to ASTM and AASHTO standards is essential, as well as proper assembly/maintenance of the mold.
- Customizing it can be achieved by altering color, creating custom molds with specific materials, following safety instructions, etc.
Understanding Grout Molds

In cement and mortar testing, grout molds form samples offer standardized shapes and sizes, enabling consistent and reliable material evaluation. They are used to form samples of mortar or concrete for various tests, including compression testing, which offers engineers and researchers the ability to evaluate the suitability of cement for specific construction applications and assess their durability.
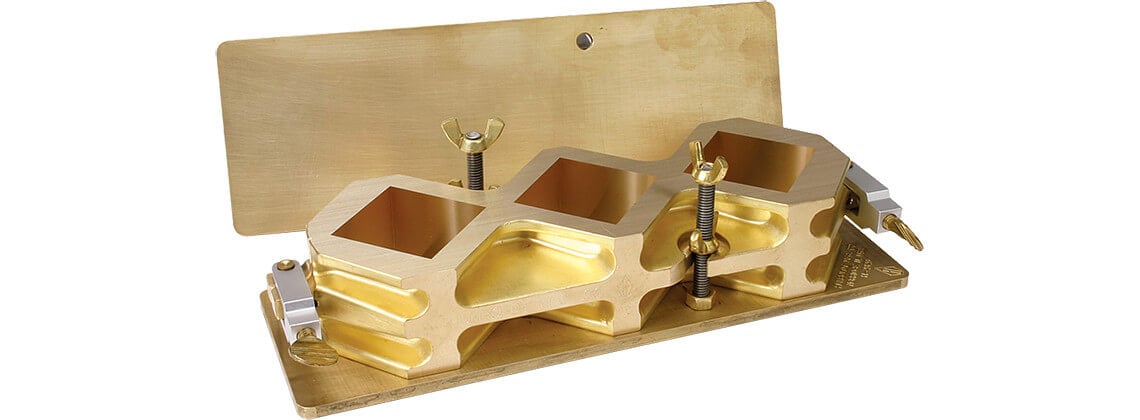
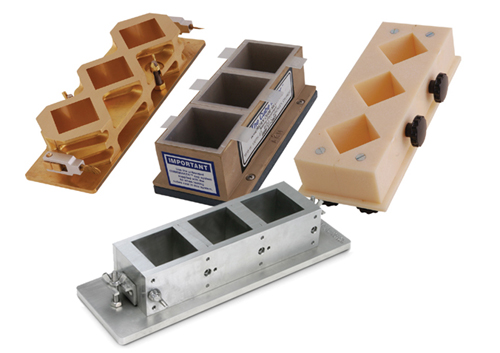
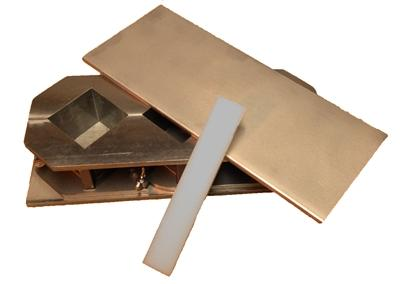
Cube molds are a valuable instrument guaranteeing quality control in cement production. They can be used by manufacturers to assess the performance and compliance of their cement products. Grout cube molds are typically constructed from rigid materials such as metal molds or plastic, with a variety of models available, including Diagonal Brass Cube Molds, Parallel Stainless Steel Cube Molds, Expansive Grout Cube Molds, and even Bronze Cube Mold options, among others.
These molds adhere to ASTM and AASHTO standards, ensuring that the results obtained from cube mold testing are accurate and reliable.
Types of Grout Molds
These molds come in various materials, including:
- Metal: rugged and adhere to specific ASTM and AASHTO standards
- Plastic: lightweight and ideal for internal quality control programs, may also comply with ASTM standards
- Stainless steel: precisely machined to generate 2-inch cubes, comply with ASTM and AASHTO standards, providing an excellent balance between durability and precision
The Econ-o-Cube is a specialized product that has been created for internal quality control programs. It is relatively lightweight, being made of plastic. Given the vast range of materials and designs, it’s important to factor in your specific testing requirements and standards when choosing a plastic grout mold.
ASTM and AASHTO Standards for Grout Molds
Compliance with ASTM and AASHTO standards for grout molds is necessary for achieving accurate and dependable results. These standards outline processes for field and laboratory sampling and compression testing of grout used in masonry construction.
By ensuring that your grout mold meets these specific standards, you can have confidence in the results of your cement and mortar testing. This not only ensures the quality of your tests but also contributes to the overall safety and reliability of construction materials and projects.
Grout Mold Features and Accessories


Grout molds come with a variety of essential features and accessories, such as:
- Self-aligning thumb screws: used to secure mold halves securely and the detachable base plate, ensuring a consistent and secure joint.
- Cover plates: protect the mold from dirt and debris.
- Curing covers: safeguard the grout mold from humidity and moisture during the curing process, helping to achieve accurate and consistent results.
One example of a grout mold with these features and accessories is the 2” Econo Cube Mold, which comes with self-aligning thumb screws, a front detachable base plate, and a cover plate. Understanding the significance of each feature and accessory can help you prepare your grout mold optimally for cement and mortar testing.
Proper Assembly and Maintenance
Correct assembly and maintenance of your grout mold is vital for securing accurate and consistent results. To assemble grout molds, first, ensure that all parts are present and in good condition, then connect the parts in the correct order, making sure they fit together securely.
When disassembling grout molds, loosen the parts before carefully removing them, maintaining the order in which they were connected. Regular inspection of grout molds for signs of wear and tear is essential for maintaining their performance and reliability.
If any parts need to be replaced, use the same type of part to ensure the continued accuracy of your tests. By taking these steps, you can guarantee a secure, tight fit and extended use of your grout molds, contributing to the overall success of your cement and mortar testing.
Grout Mold Sizes and Configurations
These are available in various sizes and configurations to accommodate different testing needs and preferences. Some popular sizes include 6x6in (152x152mm), 150x150mm, and 2-inch cube molds. These molds can be found in single-piece, split-piece, and multi-piece configurations, each with its own advantages and disadvantages.
Single-piece molds are straightforward and require minimal setup but are not suitable for larger specimens. Split-piece molds, or two mold halves, are more versatile and can accommodate larger specimens, though they require more setup and are more complex to use.
Multi-piece molds are the most versatile and can accommodate the broadest range of specimens, however, they require the most setup and are the most complex to use. Understanding the range of sizes and configurations available can guide you in making a well-informed decision when choosing a grout mold for your specific testing needs.
Grout Preparation and Compression Testing
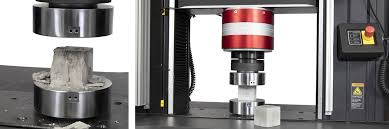

Preparing grout samples using molds and conducting compression testing are key steps in determining the compressive strength of cement and mortar. Grout samples are prepared using molds, often cubical in shape with dimensions of 15cm x 15cm x 15cm. This standardized shape and size ensure that the results obtained from the testing are consistent and reliable.
Compression testing involves applying a measured and controlled compressive force to a material using a testing machine and noting its response. This test is frequently utilized to evaluate the state of:
- an engine’s valves
- valve seats
- cylinder head
- head gasket
- piston rings
It is also essential for determining the compressive strength of cement and mortar, providing essential information for engineers and researchers.
Mixing and Filling Grout Molds
Correctly mixing grout and filling molds is vital for achieving precise results. Here’s how to do it:
- Begin by adding the grout powder to a bucket along with the appropriate quantity of water.
- Use a grout-mixing knife or trowel to blend the water and grouting powder until a thick paste is achieved.
- Mix thoroughly to create a smooth paste.
When filling the molds, it’s important to mix only enough grout for the recommended working time to ensure the consistency of the material. Proper mixing and filling of grout molds are essential for obtaining accurate and reliable results in cement and mortar testing.
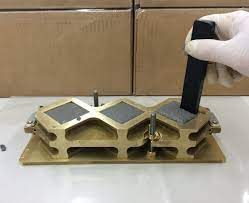
Curing and Demolding
Proper curing of grout samples is key to achieving precise results. Grout samples must be stored in moist air for 24 hours and then submerged in clear freshwater until removal before the test. Proper curing conditions ensure that the samples have the necessary strength and durability for compression testing.
A delicate technique is critical when demolding to prevent any damage to the sample. This can be accomplished by utilizing a soft brush to loosen the edges of the sample, followed by using a spatula to carefully remove the sample from the mold. By taking these precautions, you can ensure the integrity of your grout samples for accurate and reliable testing.
Compression Testing Procedure
The procedure for conducting compression tests on grout samples involves using a testing machine to apply a controlled compressive force to the material and noting its response. The rate of loading for concrete specimens during compression testing is typically 140 kg/cm2 per minute.
To determine the maximum load, follow these steps:
- Divide the applied load by the cross-sectional area of the specimen.
- This calculation provides the compressive strength of the material.
- This information is crucial for engineers and researchers when evaluating the suitability and durability of cement and mortar for various construction applications.
Applications of Grout Molds in Cement and Mortar Testing

Grout molds are fundamental in various cement and mortar testing applications, including:
- Internal quality control programs
- Mortar penetration testing
- Fabrication and curing of grout cube specimens in cement testing
- Mortar cube and grout cube testing to analyze the compressive strength of various mixes.
The Three Piece Plastic Econ-O-Cube Mold is designed for internal quality control programs. It is one example of a grout mold. Understanding the various applications of grout molds in cement and mortar testing ensures that you select the appropriate mold for your specific needs, ultimately contributing to the success of your testing endeavors.
Portland Cement Testing
Grout molds are instrumental in the testing and quality assessment of Portland cement. They are utilized to evaluate the strength and durability of Portland cement by forming samples and then compressing them to determine the cement’s strength. It must adhere to ASTM and AASHTO standards, which include specifications for size, shape, and the materials used in their construction.
Proper assembly and upkeep of grout molds are also essential when testing Portland cement. Ensuring your grout mold adheres to these specific standards and is well-maintained allows you to trust the results of your Portland cement testing.
Capping Compounds and Cement Mortar Testing
People also use grout molds to evaluate capping compounds and cement mortar, ensuring optimal performance and durability. Gradually applied, capping compounds create a flat and parallel surface on concrete samples, allowing for an even distribution of compressive load forces during testing.
The procedure for capping compounds and cement mortar testing involves the following steps:
- Apply the capping compound to the sample in an even and uniform thickness.
- Allow the capping compound to set.
- Perform the compressive strength test to ensure accurate results.
Following ASTM and AASHTO standards for capping compounds and cement mortar testing ensures your grout mold is suitable for these applications and delivers accurate, reliable results.
Tips for Choosing the Right Grout Mold

Choosing the appropriate grout mold for your testing requirements entails taking into account factors like material, size, and adherence to ASTM and AASHTO standards. The type of testing determines the material for the grout mold. For compression testing, experts generally recommend steel molds, while for mortar testing, they typically recommend plastic molds.
The size and configuration of the grout mold should be determined based on the type of testing being conducted. For instance, larger molds are more suitable for compression testing, while smaller molds are more suitable for mortar testing.
By taking these factors into account, you can make an informed decision when selecting a grout mold for your specific testing needs.
Evaluating Quality and Durability
Assessing the quality and durability of grout molds requires consideration of molds built from premium materials, featuring optimized design, and manufactured through a reliable process. The use of bronze clamps and mild acid resistance in grout mold construction ensures that the molds are sufficiently strong and resilient to bear the pressure of the cement or mortar being tested.
By evaluating the quality and durability of grout molds, you can ensure that your chosen mold will provide accurate and reliable results in your cement and mortar testing endeavors.
Customizing Grout Molds
Grout mold customization can include altering the grout color through the application of colorant or painting or creating custom molds with materials such as silicone. While handling grout and mold-making materials, wearing protective gear like gloves, goggles, and a face mask is necessary. It’s important to follow the safety instructions provided by the manufacturer.
By exploring customization options, you can create grout molds that meet your unique testing requirements or preferences. Further enhancing the success of your cement and mortar testing endeavors.
Summary
Grout molds are essential tools in cement and mortar testing, providing standardized shapes and sizes for consistent evaluation of materials. Understanding the different types, features, and applications of grout molds is essential for effective testing. Selecting the right mold and evaluating its quality and durability ensures accurate results. Proper mold selection contributes to the overall safety and reliability of construction materials. These practices support the success of your testing endeavors and the integrity of projects. Go forth and conquer the world of grout molds with confidence!
Certified MTP has the largest selection of cement testing supplies, showcasing industry-leading brands for Cube Mold for Cement Tests, Cube Mold, Bronze, 2in x 2in, Liners For 2″ Cube Maker System (198/Case), the popular Econ-O-Cube Mold, Plastic, 2x2in, Concrete Cube Molds, and fresh concrete testing equipment.
Frequently Asked Questions
What is the purpose of a cube mold?
Cube Molds are used to form specimens for concrete compressive strength testing, as well as determining mortar set times according to ASTM C403 and AASHTO T 197 standards.
What size is the Mould on a grout cube?
The HM-296 Stainless Steel Cube Molds are 2x2in in size and meet several ASTM standards and AASHTO standards for molding grout and mortar cubes.
How do you make grout cubes?
To make grout cubes, overfill the molds and use the flat side of a trowel to sprek off the top at 90 degrees to the length of the mold. Lastly, draw the flat side of the trowel lightly over the top surface of the cubes.
What is the ASTM standard for making grout cubes?
According to ASTM C 109, the standard for making grout cement mortar cubes is to use 1 part cement and 2.75 part sand for testing the compressive strength of mortar or grout cubes.
What materials are typically used for grout molds?
Metal, plastic, and stainless steel are the materials most commonly used for grout molds.
Related Blogs for Grout Molds:
Ultimate Strength Epoxy Gel: The Reliable Adhesive Solution
Top Deck Epoxy Sealer for Durable Wood Finish
Correctly Measure Cracks and Fissures with a Concrete Testing Product
What is Non-Destructive Testing of Concrete?
Ultrasonic Pulse Velocity Test | Concrete Non-Destructive
Understanding Non Destructive Test: Methods & Applications
Crack Measurement in Concrete: A Guide to Accurate Results
Protection with Waterproof Epoxy Glue: Your Bonding Solution
Steel Concrete Molds: Your Guide for Endurance and Precision
Exploring the Poly Mold for Cement and Mortar Testing
Concrete Cylinder Molds for Testing and Construction
Concrete Cylinder Molds: All You Need to Know
Tampering Rod for Concrete Slump and Cylinder Mold Tests
Cement Casting Molds: Everything You Need to Know


