


Ready to dive into the world of concrete molds but not sure where to start? This video guide strips away the confusion and lays out exactly how to create a mold for concrete, whether you’re a beginner or looking to refine your technique. From selecting durable materials to pouring the concrete and troubleshooting common issues, we’ll walk you through each step to ensure your project is a solid success.
Key Takeaways
- Choose the right molding material—silicone for flexibility and durability, latex for elasticity, or melamine-coated wood for a sturdy, cost-effective option for how to create a mold for concrete.
- Design your mold with simplicity in mind for easier demolding, but don’t shy away from complexity if you’re up for a challenge—just be prepared for a bit more work.
- Use a release agent, such as vaseline or a commercial product, to prevent the concrete from sticking to the mold and ensure easier demolding after the curing process.
Choosing the Right Material for Your Mold
When learning how to create a mold for concrete, you’re spoilt for choice. From foam to polyurethane, wood to acrylic, there’s a whole world of possibilities out there. But for our purposes, we’re going to focus on three standout options: silicone, latex, and melamine-coated wood.
Silicone molds are the superstars of the molding world. Flexibility, durability, and versatility are their middle names. Whether you’re making candles, soap, or, in our case, concrete molds, silicone molds are your reliable partner in crime. They can endure extreme temperatures and are practically indestructible. What’s not to love?
Latex, on the other hand, is renowned for its elasticity and strength. It’s the go-to for creating decorative pour concrete, stamping cement, and crafting statues, masks, and stone veneers. Just imagine the masterpieces you could create with this resilient material!
Lastly, we have the unsung hero of the molding world: melamine-coated wood. This inexpensive and cost-effective material is a sturdy and aesthetically pleasing choice for concrete casting. It’s essentially a resin coating fused to particleboard, MDF, or plywood, providing a robust structure for your molding needs.
How to Create a Mold for Concrete: Preparing Your Design
Having selected our materials, we can now proceed to the design process. This phase invites your creativity! Keep in mind, though, that design isn’t solely about aesthetics. It plays a significant role in the durability and lifespan of your concrete casting, too.
When it comes to mold design, simplicity is key. Smooth and simple shapes make it easier to get the concrete out of the mold, especially for concrete countertops. But don’t worry, this doesn’t mean your design has to be boring. Even with simple shapes, you can create patterns and textures to give your project a unique touch.
However, if you’re feeling adventurous and want to experiment with complex designs, go for it! Just keep in mind that more complex designs can make it trickier to cast and remove details from the concrete. But with a bit of practice and patience, you can create stunning and durable concrete castings.
Keep Reading: How to Deal with Moisture in Concrete Floors.
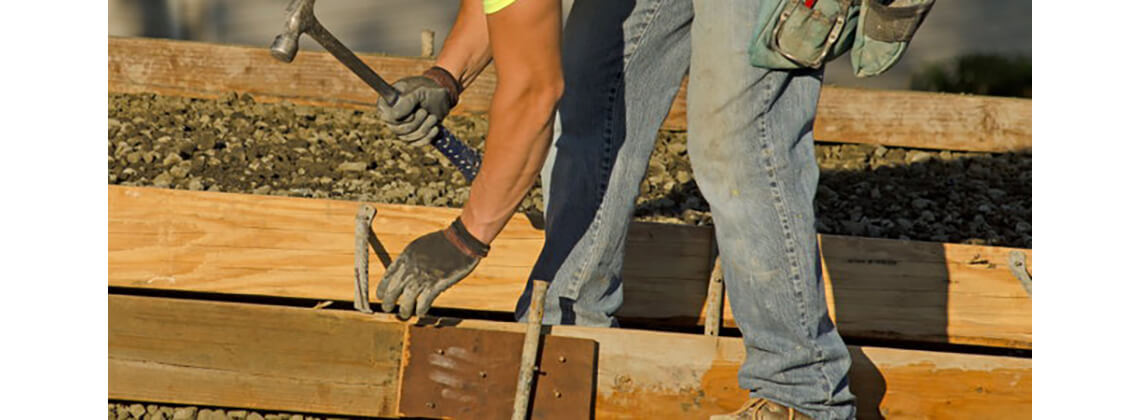
Constructing a Wooden Frame for Concrete Molds
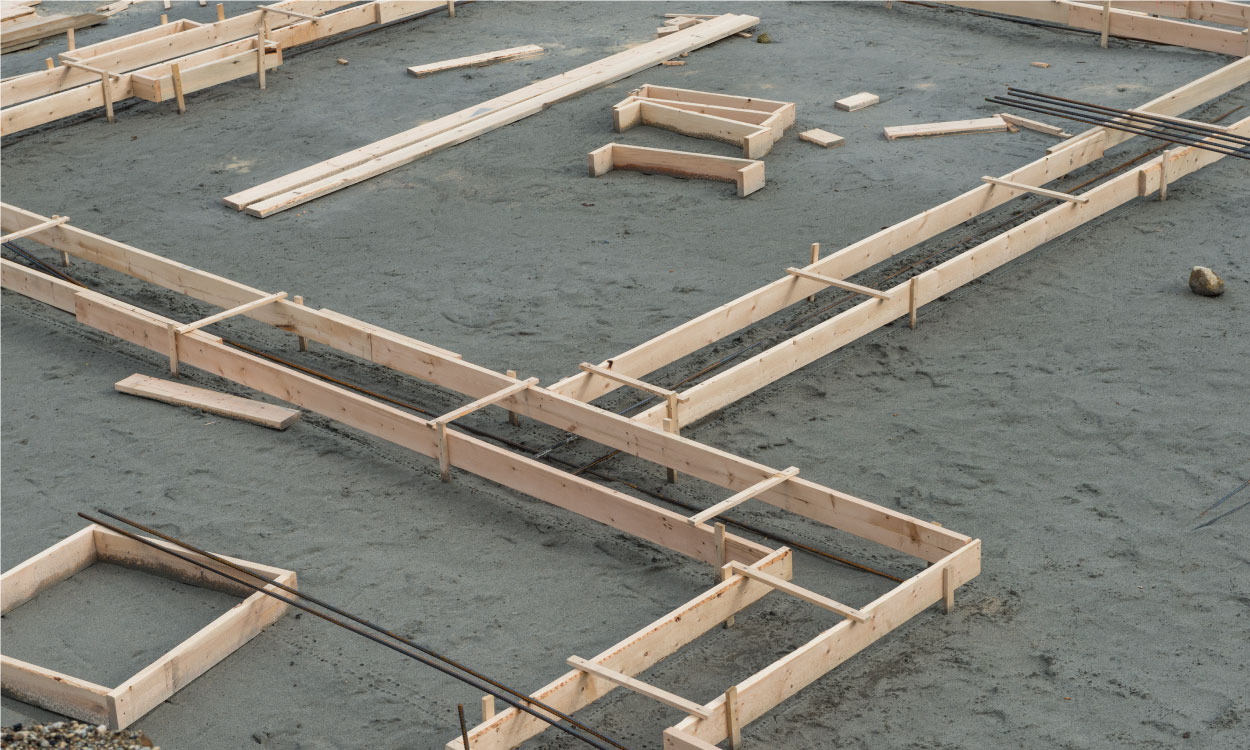

It’s time to get hands-on and construct a wooden frame for our concrete molds in discovering how to create a mold for concrete. SPF timbers, known for their strength and lightness, are our recommended choice for the frame. For the molds, disposable melamine boards serve as an affordable and convenient alternative.
Start by marking out the perimeter of the mold on your work surface, then drive stakes at the corners. Next, attach the wooden forms and reinforce the structure for stability. Pocket screw holes are a handy technique for joining the wooden forms together.
Gather your tools:
- a circular saw
- a caulking gun
- a cordless drill with drill bits
- screws and nails
A pro tip: use corn starch as a release agent for the mold. It’s a simple trick that can make the demolding process a breeze.
More Read: How to Calculate Heat Index.
Crafting Silicone and Rubber Molds
There’s something truly satisfying about crafting your own silicone and rubber molds. Not only does it allow for more intricate designs, but it also gives you complete control over the final product. To make rubber molds, you’ll need 100% silicone, cornstarch, and water.
The creation of a silicone mold involves the following steps: making or securing a master pattern, setting up the mold box, and pouring the silicone. It’s imperative that the master pattern fits correctly inside the mold box. Once the silicone has solidified, you can extract and form the mold, and you’re all set for casting!
When using cornstarch to make rubber molds, follow these steps:
- Start with a small amount of cornstarch.
- Gradually add more cornstarch as you mix it with silicone caulk.
- Mix until you achieve a smooth and consistent texture.
- Use the mixture to create your mold. The result? A flexible, durable rubber mold perfect for capturing detailed designs.
Applying Release Agents
With our molds prepared, we can move onto the pre-casting setup. Here, release agents play a pivotal role. These special substances establish a barrier between the concrete and the mold, guaranteeing an easy removal of the cured concrete without it sticking to the mold.
You can opt for commercial release agents like:
- PAM
- Johnson paste wax
- FormGuard
- Crete Lease 20-VOC
These products are specifically designed for concrete casting and can guarantee optimal results.
Alternatively, you can use vaseline as a release agent. It’s easy to find, releases concrete castings well, and doesn’t damage the mold. However, be sure to clean the mold thoroughly after use to avoid any residual vaseline affecting the finish of your next project.
How to Create a Mold for Concrete: Pouring
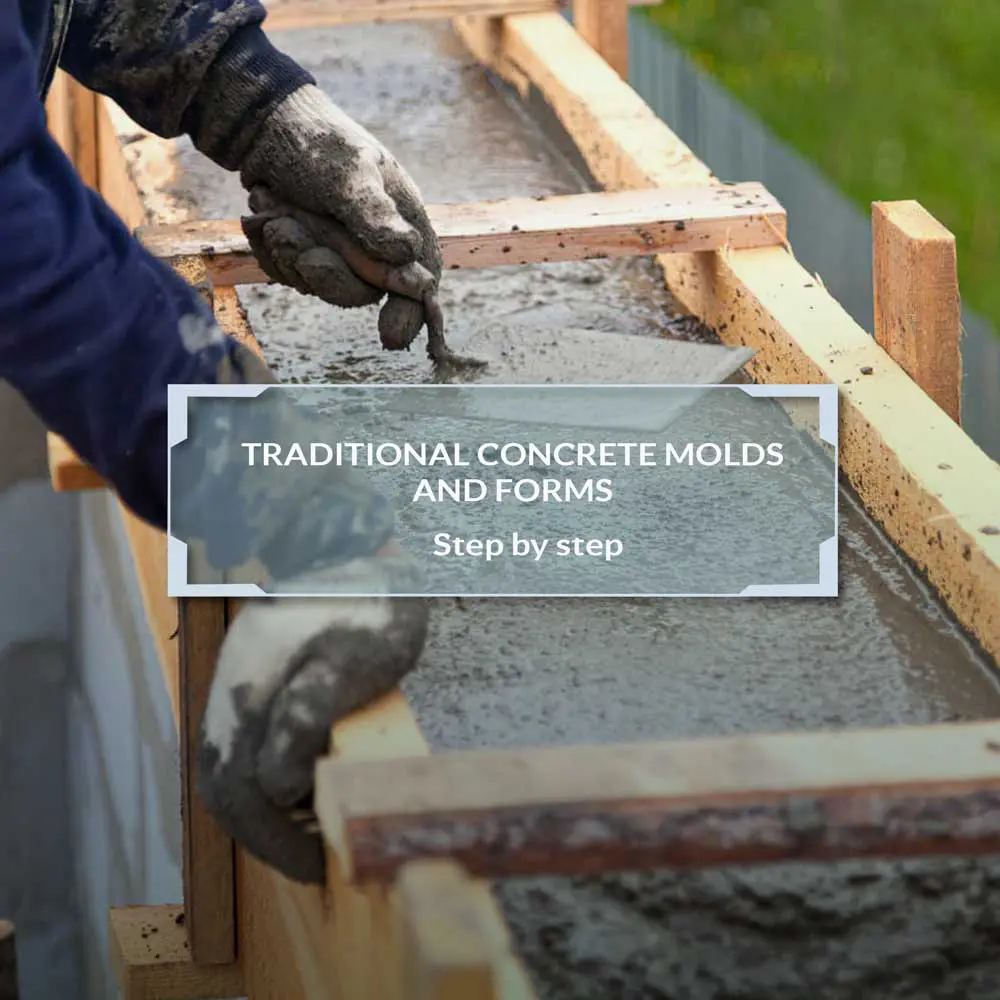

We’ve reached the crucial stage of building: casting concrete! Initially, you must ensure that your concrete mix contains minimal aggregate for a smoother, more defined cast.
Pour the concrete carefully into the mold, ensuring it’s evenly distributed. Remember to tap the mold and use a rubber mallet on the sides to help spread the poured concrete and push out any air bubbles.
Lastly, remember to wear a protective mask when mixing dry ingredients and oil the molds before pouring, so the concrete comes out easily once cured.
Post-Casting Steps
Following the concrete pour, we must allow it to cure. This is a vital phase in the concrete casting process, which includes keeping the concrete damp by misting it with water 5-10 times daily for the initial 7 days. Or to save some, you could opt for a sealing technique or a curing compound to inhibit water evaporation.
Concrete usually needs to stay in the mold for a few days to gain strength, and it’s fully cured in about 28 days. Patience is key here; rushing the process could compromise the quality of your cast.
After the concrete has cured, it’s time to remove the cast from the mold. Here are the steps to follow:
- File and polish the cast to smooth out any rough edges.
- Scrub away any residual mold using a brush and water.
- Use tools like spreaders and bandage scissors for safe removal.
Once the plaster cast is removed, clean the mold with warm soapy water and store it in a dry, airtight container.
Troubleshooting Common Issues
Even with meticulous planning and execution, you may run into some common issues like chipping, uneven surfaces, and air bubbles. But don’t worry, we’ve got you covered.
Chipping can be minimized by:
- Rounding or chamfering the edges of the mold where they touch the concrete
- Regularly checking the molds for damage
- Applying a water-repellent sealant after curing
These steps can help prevent chipping while you sit inside.
Uneven surfaces can be smoothed out by:
- Ensuring the water and cement are mixed correctly
- Leveling the forms
- Using methods such as polyjacking with high-density foam
- Tapping the mold to move the mortar and push the bubbles out to avoid air bubbles
- Adjusting the concrete mix for better consistency
- Applying a smooth on layer to the surface.
Advanced Techniques for Complex Molds
Eager to elevate and develop your mold-making abilities for future projects? We’re going to explore some advanced techniques for fabricating intricate molds, like multi-part molds and wood grain textures.
Multi-part molds are ideal for capturing complex shapes that would be challenging to create with a single-part mold. They typically involve making two or more parts of the mold from a master or CAD model, creating cavity molds, split-molds, and sprues.
Creating a wood grain texture in a mold involves the following steps:
- Lifting the grain of wood
- Sealing the wood
- Prepping for casting rubber
- Mixing and pouring silicone or rubber
- Doing some finishing work
The result? A beautifully textured mold that adds a touch of rustic charm to your concrete casts.
Summary
We’ve journeyed from choosing the right materials to casting, post-casting, troubleshooting, and even exploring advanced techniques for how to create a mold for concrete. By now, you should be well-equipped to start your own concrete casting project. Remember, practice makes perfect, and with each project, you’ll refine your technique and create more beautiful, durable concrete molds. So, what are you waiting for? It’s time to get molding!
Certified MTP has the largest selection of concrete testing supplies, showcasing industry-leading brands for Slump Cones, Tamping Rods, Concrete Air Entrainment Meters, slump testers, Concrete Test Cylinder Molds, and fresh concrete testing equipment. We also offer the largest selection of tamping rods for concrete tests.
Frequently Asked Questions
What can I use to make a mold for concrete?
You can use uncoated wood or coated wood with a slick surface, like a 3/4-inch thick MDF board topped with melamine, to make a mold for concrete. This shape will help the concrete to release easily once it has cured.
How to create a mold for concrete statue?
You can make a mold for a concrete statue using latex rubber molds. Just follow the instructions for making concrete statues with latex rubber molds.
How do I design a mold?
When designing a mold, opt for smooth, simple tube shapes to make it easier to release. Keep in mind that complex designs may be trickier to cast and remove.
What should I do before pouring concrete into the mold?
Before pouring concrete into the mold, make sure to apply a release agent to prevent the concrete from sticking to the mold. This will make it easier to remove the concrete once it’s cured.
How to create a mold for concrete curing?
Keep the concrete wet by spraying it with water 5-10 times a day for the first 7 days, or use a curing compound to prevent water from evaporating. This will help cure the concrete properly.


