


The sand cone test is a cost-effective alternative to nuclear gauge testing used to determine if the density of soil in place at a construction site meets the specifications of your project, or if corrective measures will need to be taken before construction can begin. It’s an important test to perform because, if the soil is not the proper density, it could increase the rate of settlement post-construction and compromise structural support, potentially putting lives at risk. While you won’t get results as quickly as with the nuclear gauge method, the sand cone test is still a relatively simple test that doesn’t take long to perform, outside of drying your samples.
Equipment Needed for the Sand Cone Test
The sand cone test only requires a few simple, relatively inexpensive pieces of equipment to be performed. You can find all of the necessary sand cone test equipment listed here at Certified Material Testing Products.
While dry and wet sieving follow many of the same principles, there are certain supplies designed specifically for wet sieving that you will need to have in your lab in order to perform the procedure accurately and efficiently.
-
-
- Trowel: Used for digging the test hole at the job site and extracting your soil sample.
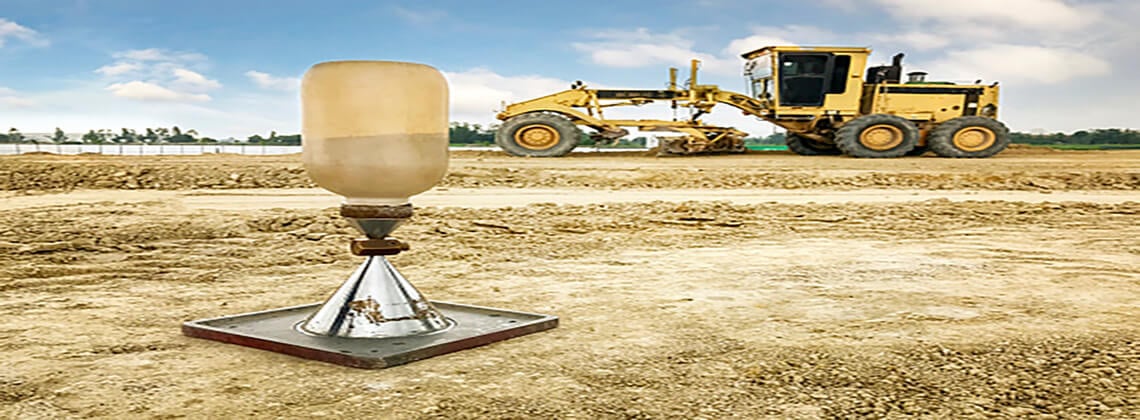
- ASTM Sand: Used to find the volume of your test hole — standardized for ASTM specifications.
- Plastic Sand Bags: Used to collect the soil sample and retain moisture until the test can be performed.
- Scale: Needed to weigh your sand cone test equipment, as well as sand and soil samples.
- Compaction Mold: Also known as a Proctor mold, it is used in the beginning of the sand cone test to find the weight of dry sand.
- Field Density Plate: Used as a guide for digging your test hole and filling it with the proper amount of sand.
-
li>
- : A jar coupled with a detachable cone fitting that is threaded on one end to stop or allow the flow of sand.
- Evaporating Dish: Used to weigh and dry moist soil samples.
- Vacuum Oven: Needed to dry your soil sample over a 24-hour period.
Equipment Needed for the Sand Cone Test
Now that you’ve gathered the necessary equipment, the sand cone test can be performed in a few simple steps and with a few easy equations.
Step 1: Find the Dry Unit Weight of Sand
In order to perform the first portion of the sand cone test, you will need to gather your scale, compaction mold and sand. First, you will need to record the weight and volume of your compaction mold, followed by the weight of the mold after it has been filled with dry sand. Once you’ve obtained these values, subtract the combined weight of the sand and compaction mold from the starting weight of the mold and divide the difference by the mold’s volume. This is your dry unit weight of sand.
(Weight of Mold & Sand – Weight of Mold) ÷ Volume of Mold = Dry Unit Weight of Sand
Step 2: Determine the Weight of a Coneful of Sand
Bring out your sand cone density apparatus and record its weight. Make sure the cone thread is in the open position and pour the dry sand carefully from your compaction mold into the density apparatus. Record the weight of the apparatus now that it has been filled with sand.
After weighing, close the cone and flip the entire apparatus upside down, placing the mouth of the cone on the table. Open the thread again and allow the sand to pour out while the cone is on the table until no more sand can come through. Close the cone again and return your apparatus to the proper position, leaving the discarded sand on the table. Weigh the apparatus with its remaining sand. Now, you simply need to take the difference of the first value (apparatus and sand) and the second value (apparatus and sand minus a coneful) to find the weight of a coneful of sand. You should also subtract the weight of the apparatus in order to find the true weight of the sand.
Weight of Apparatus & Sand – Weight of Apparatus & Sand2 – Weight of Apparatus = Weight of a Coneful of Sand
Step 3: Prepare the Test Hole & Collect Your Soil Sample
Now that you have your initial values, it’s time to dig. First, secure your field density plate to the soil. Use your trowel to dig a hole 10cm deep, using the circular cutout in the center of the plate as your guide. As you dig, place your soil in a plastic sand bag to ensure it doesn’t lose moisture before it is weighed in the following steps.
Step 4: Determine the Volume of the Test Hole
Now that the test hole is prepared, its volume can be calculated. Bring out your sand cone density apparatus with its remaining sand and make sure the thread is closed. Tip the apparatus over and set it above the hole in the base plate. Open the thread and allow the sand to pour out until it stops, indicating that it has filled the hole. Close the thread again and lift the apparatus away. Record the weight of the apparatus again.
You can now calculate the volume of the test hole by subtracting the weight of the sand cone apparatus when it was full of sand from the weight of the apparatus after filling the hole and the weight of a coneful of sand. Subtracting the weight of a coneful of sand is important because, when you lift the apparatus away, you will be left with the amount of sand in the hole in addition to the sand that filled the cone. Additionally, you should subtract the amount of space between the base plate and the surface of the hole, which adds a small amount of volume that could skew your results. Accounting for the coneful of sand and the thickness of the base plate is known as the cone correction factor. Add the weight of a coneful of sand and the thickness together to simplify the calculation.
Weight of Apparatus & Sand – Weight of Apparatus & Sand3 – Cone Correction Factor ÷ Dry Unit Weight of Sand = Volume of Test Hole
Step 5: Determine the Moist Unit Weight of the Soil Sample
To determine the moist unit weight of soil, you will first need to take the weight of your evaporating dish. Add the soil sample to the dish and weigh it again. You can now calculate the moist unit weight of the soil. Subtract the weight of the wet soil from the weight of the evaporating dish with the wet soil in it and divide the difference by the volume of the test hole to determine the moist unit weight of the soil.
Weight of Evaporating Dish & Wet Soil – Weight of Wet Soil ÷ Volume of Test Hole = Moist Unit Weight of Soil
Step 6: Determine the Water Content of the Soil
After calculating the moist unit weight of your soil sample, place the dish and soil in a vacuum oven and allow the soil to dry until it reaches a constant weight. To achieve this, dry your sample at around 221°F for 24 hours, adding more time if needed. When dry, you can calculate the water content of the soil (expressed as a percentage) with the following equation:
Weight of Wet Soil – Weight of Dry Soil ÷ Weight of Dry Soil – Weight of Evaporating Dish = Water Content of Soil
The moist unit weight of the soil and the water content of the soil are both critical values to be aware of prior to construction since the presence of moisture can greatly change the density of soil, hinder its strength and alter the way a structure settles, causing damage and instability later on.
Related Blogs for Sand Equivalent Test:
Sand Equivalent Test: What Can You Learn


