


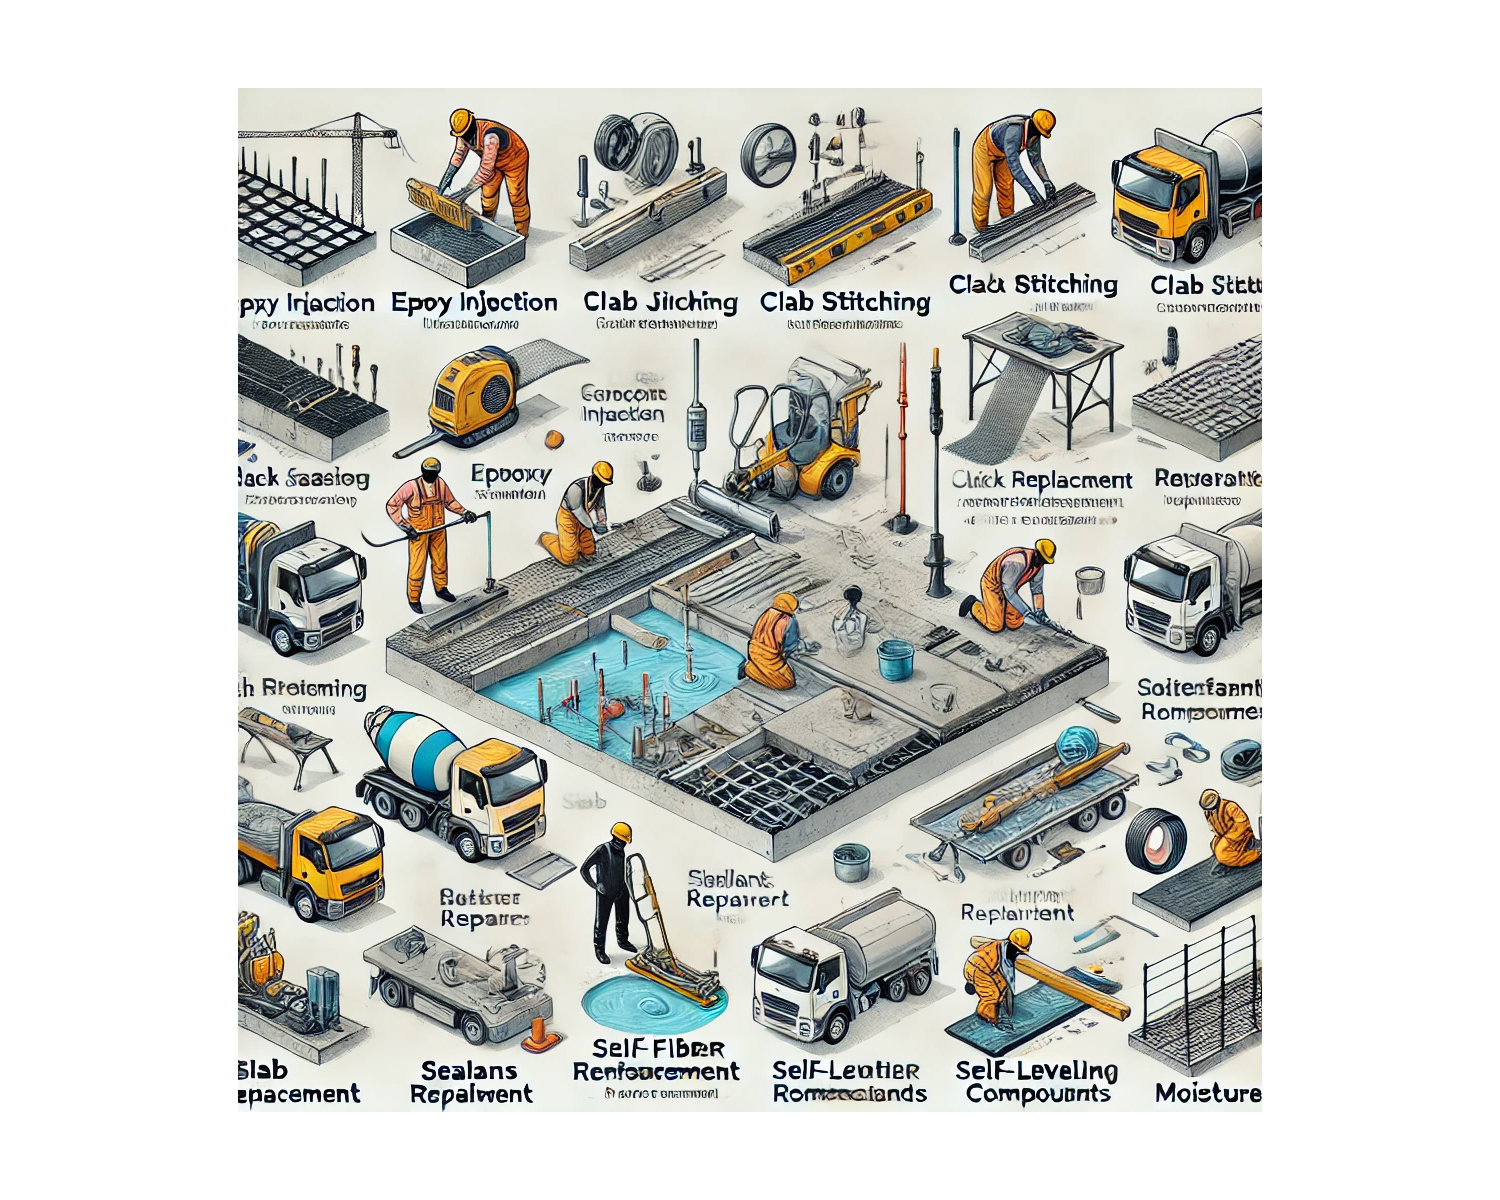
Some of the top concrete slab repair methods include epoxy injection and “routing and sealing” for cracked concrete and polyurethane foam concrete lifting for sunken slabs.
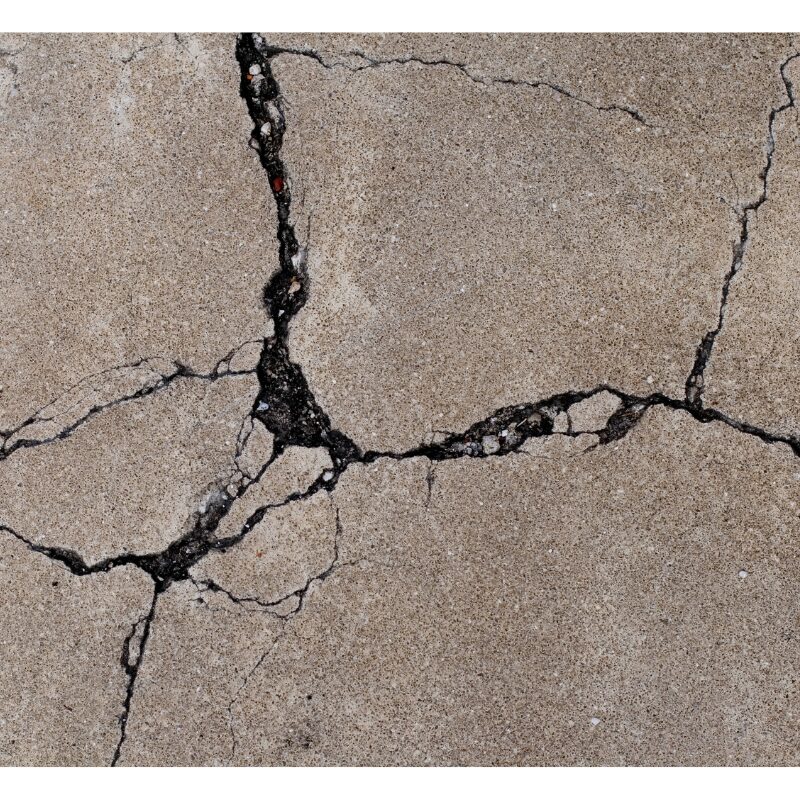
Concrete is a pretty tough material. But it ages just like everything else, and aging can cause some serious issues (such as cracking).
While certain issues will require professional assessment for the best (and safest) results, many common problems can be solved with DIY concrete slab repair solutions.
What are the top concrete slab repair solutions? This article will explore the issues you may already be experiencing and the concrete slab repair methods that can fix them.
Concrete Slab Repair Methods
Cracks are some of the most common and problematic signs of aging in concrete. In many cases, they begin on the slab’s surface and get deeper over time. They can even split the slab or begin to degrade the rest of your home’s structure if left unaddressed.
Foundation repair is also a critical aspect of maintaining the structural integrity of your home.
Understanding different concrete repair methods is crucial to effectively address issues like cracks in concrete slabs. Factors such as the extent of damage, location, and intended use of the structure should be considered when selecting the most appropriate repair method. Consulting with professional concrete repair companies can help assess specific needs and recommend the best repair method for restoring structural integrity and ensuring durability.
So, when you notice a split in your driveway, foundation, or other area of your home, you need to make concrete slab crack repair your top priority.

Some of the best concrete crack repair methods are:
Epoxy injection
The epoxy injection method of concrete slab repair methods are basically injecting epoxy resin, a type of polymer-based grout, into slab cracks to glue the concrete together. The epoxy resin’s non-shrink properties and varying viscosities make them arguably the best polymer-based grout.
They have high tensile capacity than normal concrete, allowing them to bond to the concrete effectively and restore it to its original strength.
Epoxy injections are suitable for repairing cracks as narrow as 0.05 mm (0.002 inches).
The method involves establishing entry and venting ports (at close intervals) along the visible cracks, sealing the cracks on exposed surfaces, and injecting the epoxy into the cracks. The resin seals the crack when it hardens.
The specific process for using epoxy injection to repair concrete cracks are:
Clean cracks
Ensure the area to be repaired is free of contaminants (oil, dirt, fine particles of concrete, etc.).
Contaminants prevent epoxy penetration, reducing the effectiveness of the repair.
Vacuum the cracked area or flush it with water (and allow it to dry) before you start injecting the resin.
Seal cracks
Seal the cracks’ surfaces to prevent the epoxy resin from leaking out before it hardens.
Insert the entry and venting ports
Leave spaces for the injection nipples along the cracks. These should be at close intervals (maximum spacing of 300mm).
Mix the epoxy
Mix the resin according to the manufacturer’s instructions. Ensure you mix the amount you can use before it hardens.
Inject the epoxy
Use paint pressure pots or air-actuated caulking guns to inject the resin into the cracks via injection nipples.
Maintain an injection pressure between 0.1 – 0.5 MPa. For vertical cracks, start at the entry point at the lowest elevation. For horizontal cracks, work from one end to the other.
Remove the surface seal
After the injected epoxy hardens, remove the entry ports, then remove the surface seal and smoothen the surface.
However, epoxy injections work only when the crack is dormant and dry. Injecting epoxy resins into active cracks will cause cracking to reoccur near the original crack. Also, most epoxies do not adhere to moist surfaces.
Routing and sealing
Routing and sealing is one of the most common concrete crack repair techniques. It involves enlarging the crack along its exposed face and pouring a sealant into it to seal it.
Routing and sealing is typically used for non-structural repairs, making it ideal for addressing surface-level cracks.
Popular sealants used include epoxies, silicones, urethanes, polymer mortars, polysulfides, or asphaltic materials. Concrete gouts are not suitable because of cracking.
The simple routing and sealing technique can be used to repair both fine pattern cracks and larger isolated cracks.
However, it should only be used for remedial repairs, as it is unsuitable for structural repairs.
The technique is most suitable for repairing concrete cracks on flat horizontal surfaces like floors and pavements.
But you can also use it to treat cracks on vertical surfaces (like walls) and curved surfaces (pipes, poles, etc.).
The specific process for using routing and sealing to repair concrete cracks are:
Widen the crack
Cut a “V” shape groove along the crack, which should be ¼ – 1 inch (6 – 25mm) in depth. This is to allow additional sealant to enter the crack for effective sealing. You may use a hammer and chisel for this.
Clean the crack
Contaminants prevent effective penetration of the sealant. Use a wire brush to remove all of the dirt, debris, fine particles of concrete, etc.
You may also airblast or water-blast the cracked space for better results. When you use water to clean out the crack, wait until excess moisture has dried.
Mix up the sealant
A trowel will work best for this process. Use a sealant right for the application. For example, when treating cracked concrete floors, use a sufficiently rigid sealant to support traffic.
Apply the sealant
Fill the crack with the sealant. Puncture the compound with the trowel to work out air pockets so the crack is totally filled. Once the compound is level with the surrounding concrete surface, smooth it out and allow it to cure.
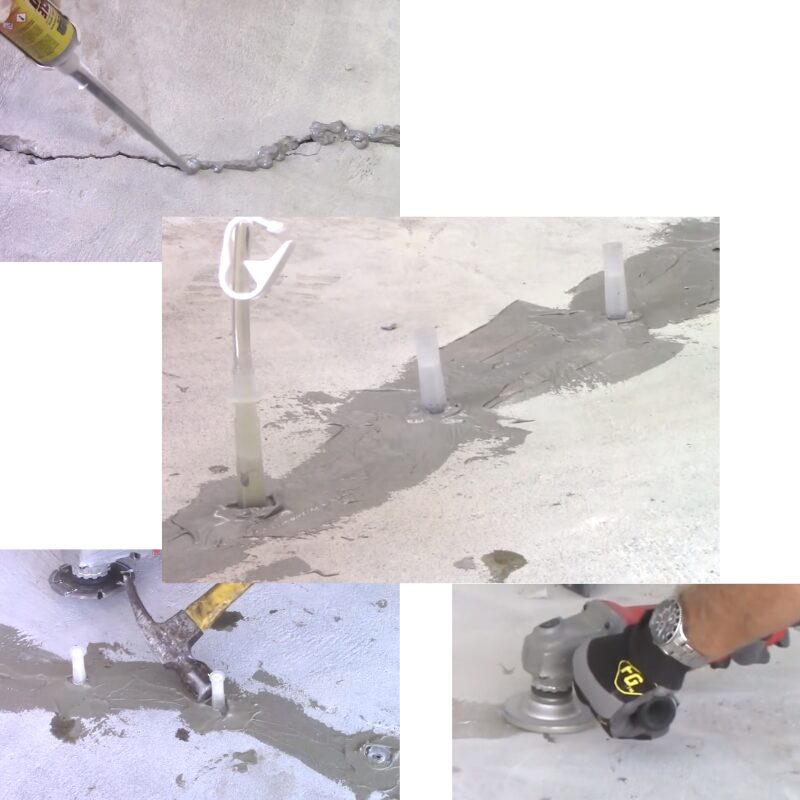
Stitching
Stitching is a concrete crack repair technique that involves drilling holes on both sides of a crack and grouting in staple-like U-shaped metal units, making it effective for active cracks.
This is akin to “stapling” the crack. Unlike the “routing and sealing” or epoxy injection techniques, stitching does not close the fissures.
The metal bars placed perpendicular to the cracks hold either side of the crack together, preventing the widening of the crack.
This makes stitching an effective concrete repair technique for active cracks. Stitching is a choice technique when tensile strength must be reestablished across major cracks.
The specific steps for stitching a concrete crack are as follows:
Drill holes across the crack
Each pair of holes should be on opposite sides of the concrete, separated by the crack. These holes will hold the legs of the stitching metal units.
Make shallow cuts across each hole
You may make shallow cuts on the crack, connecting each pair of holes. The metal bar will sink into these cuts to be flush with the concrete.
Clean the holes and cuts
Ensure that the insides of the holes and cuts are free of contaminants that will get in the way of the metal bar or the bonding agent you’ll use to hold them in place.
Insert the U-shaped metal units into the holes
Each metal bar should be perpendicular to the crack line. The bars should be strategically placed to evenly spread the tension across the cracked area.
Anchor the metal units
Use a non-shrink grout (like epoxy resin) to hold each metal unit in its hole.
Drilling and plugging
Drilling and plugging is a simple, cost-effective way to repair cracked concrete structures. The drilling and plugging method involves drilling holes in the crack and filling it with grout.
The grout forms a key that locks the crack, preventing it from widening or spreading.
The specific process for using the drilling and plugging technique to repair cracks are:
Drill holes
Drills several holes of 2 – 3 inches (50 – 75mm) diameter in the crack. Follow the crack as you drill, but ensure the holes are at close intervals.
Clean the hole
Ensure there are no debris or loose concrete particles that will get in the way of your grouting material.
Fill holes
Fill each hole with grout. You may use a resilient material of low modulus if you desire water tightness but not structural load transfer.
Note that the drilling and plugging concrete crack repair method is only recommended for cracks on vertical concrete surfaces running in a relatively straight line.
You may also like: What is Non-Destructive Testing of Concrete?
Concrete surface repair methods and concrete slab repair methods
Concrete structure damage is not limited to cracking. Understanding different concrete repair methods is crucial to effectively address issues like scaling in concrete slabs.
Proper surface preparation is essential to ensure the effectiveness of concrete surface repair methods.
Scaling is a degradation of the slab’s surface, which can look like pits or “scales,” to a depth of 1.5mm – 5mm in the first year after placement and hardening.

There are generally two methods to repair concrete scaling, depending on the extent of damage. These are:
Light and medium concrete scaling repair
If only minor scaling of the concrete surface is affected, you can repair it by applying a resurfacer to the concrete surface to reduce or eliminate the ability of water to penetrate the concrete.
The specific steps for using a resurfacer to repair light concrete surface scaling are as follows:
Remove weak material
Use a hammer and chisel to remove all weak concrete around the damaged areas. This ensures there is no unsound concrete that’ll compromise your repairs.
Clean the concrete surface
The area to be repaired should be clear of debris and dirt that will prevent the bonding material from working effectively. Use a stiff brush to sweep and clean the area.
Apply the resurfacer
Spread the resurfacer evenly over the damaged area. Make sure the sealant is level with the surrounding concrete.
Cure the repair
You may want to cover the repair with plastic sheeting to keep it moist as it cures. After the repair cures, you may apply a concrete sealant to add another layer of protection.
Severe concrete scaling repair
When scaling affects more than a concrete’s surface, deep scaling repair is needed, which involves removing and replacing the damaged concrete.
The specific steps for deep scaling repair are as follows:
Remove damaged concrete
Use a jackhammer or concrete saw to rough up and cut out the damaged concrete. Ensure you reach solid, undamaged concrete.
Clean the area
Sweep the prepared areas with a stiff brush to remove all debris. Then wash the area with a pressure washer and let it dry completely.
Apply a thin layer of cement paste
Place a thin layer of cement paste over the surface that will receive the new concrete.
Apply patching material
Mix the new concrete and apply it over the surface. Keep the surface damp before adding the resurfacing material. Ensure the resurfacing material is level with the surrounding surface.
Cure and seal
Let the poured concrete cure sufficiently. Depending on the project, curing can take up to 5 days. Then apply a sealant on the repaired surface.
This covers all the construction joints, protecting the new surface from moisture, de-icing salt, and other destructive forces.
Concrete slab repair methods for leveling and lifting
Another common problem of concrete is settling, which happens when the foundation of a structure sinks into the ground over time. Uneven front steps and irregular driveways are examples of this concrete damage.
An uneven slab can be a dangerous tripping hazard. Also, understanding different concrete repair methods is crucial, as allowing settling to progress too far can cause cracks to begin forming in your home’s foundation, basement, or walls.
Treating concrete settling problems requires raising the concrete slabs back to their original positions. This is a concrete repair method called concrete lifting or leveling.
There are different concrete slab lifting methods, depending on the material used. These include:
Polyurethane foam concrete lifting
Polyurethane foam lifting uses an expanding polyurethane foam to lift the concrete slabs. A two-part polyurethane foam is injected under the concrete slab.
The two-part foam then combines and undergoes a chemical reaction that makes it expand. The expansion exerts pressure on the settled slab and gently raises it.
The specific methods for using the polyurethane foam lifting method are:
- Drill holes (about ⅝ inches in diameter) in the settled slab.
- Inject the two-part liquid foam beneath the slab through the holes.
- Patch the drill holes after the foam expands and lifts the slab.
The polyurethane foam lifting method is more durable as the foam last significantly longer than other lifting materials.
The foam can be injected faster, giving you faster repair. Also, the holes are smaller than those required by other lifting methods.
However, the polyurethane foam concrete lifting method is significantly more expensive.
Mudjacking as Concrete Slab Repair Methods
Mudjacking is a slab lifting method that uses a filler called “mud” to lift the sunken slab. The “mud” consists of materials like concrete, limestone, sand, and water.
The mudjacking process is as follows:
- Drill holes (about 2 inches in diameter) on the sunken slab.
- Inject the filler mud beneath the slab through the holes.
- Patch the holes after the filler mud cures.
Mudjacking has the advantage of being cheap. Also, it can lift heavy slabs and is very durable when done correctly. However, it is highly pressurized and can be hard to control.
Stone slurry grout concrete lifting
The stone slurry grout concrete lifting method uses a mixture of limestone and water to lift the settled slab.
The process is as follows:
- Drill holes (1 inch in diameter) on the slab.
- Inject the slurry (a mixture of pulverized limestone, Portland cement, and water) under the slab via the holes.
- After the pack pressure from the slurry has raised the slab, allow it to cure. Then patch the holes.
The stone slurry method offers the highest compressive strength, making it ideal for applications that require heavy loads (e.g., a garage floor, etc.).
Concrete slab reinforcement and structural repair methods
Construction elements that are intended to carry heavy loads could be compromised structurally if they are not reinforced. But sometimes, steel reinforcements can deteriorate and would need repairs to maintain the structure’s structural integrity. Corrosion of steel reinforcements is a common issue that can compromise the structural integrity of concrete slabs. Understanding different concrete repair methods is crucial to effectively address issues like reinforcement and structural repairs in concrete slabs.
The methods for repairing concrete slab reinforcements differ for mild steel and prestressing steel.
The appropriate method will depend on the extent of corrosion/ deterioration.
However, whatever method you choose, you’ll need to remove concrete around the steel bars and clean the area.
Reinforcement repair for mild reinforcing steel
For mild reinforcing bars, there are three repair methods for concrete reinforcements. You can replace the deteriorated reinforcements, supplement partially deteriorated bars, or coat deteriorated bars.
Let’s explore them in detail.
Replacement of reinforcement
When you choose reinforcement replacement, you need to cut out the deteriorated parts of the reinforcement and splice in mild reinforcing steel.
You may use weld splice for bars not greater than 25mm. You may also use a mechanical connection to splice the steel bars.
Supplemental reinforcement
When the original reinforcement is inadequate or needs strengthening, you may choose to add supplemental reinforcement.
The existing bars do not need to be removed. Instead, you clean them up. Then, remove parts of the original concrete to create extra space for placing the additional reinforcement. You may use a lap splice.
Coating of reinforcement
Another repair method for mild reinforcing steel is coating the deteriorated bars. After reaching the bars, clean them up and coat them with epoxy or polymer cement slurry.
The coating protects the bars against corrosion. Ensure the coating’s thickness is less than 0.3mm to minimize loss of bond development.
Reinforcement repair for Prestressing steel
There are two repair methods for prestressing steel, depending on whether the prestressed steel is bonded or unbonded.
Bonded strands
Only the exposed section of bonded strands is restressed. You replace the damaged section with a new section of strand. You should post-tension the new section and the exposed part of the existing strands to match the stress level of the banded strand.
Unbonded tendons
Protect the end connections and the strand against corrosion using corrosion-inhibiting material (like grease). If there is heavy corrosion, replace the strand.
Chemical patching and bonding methods
Some concrete repairs may require laying fresh concrete on pre-existing concrete. However, that will give you two separate layers of concrete because new and old concrete ordinarily do not stick together.
Understanding different concrete repair methods is crucial to effectively address issues like chemical patching and bonding in concrete slabs. Chemical concrete bonding involves applying a liquid bonding agent on the surface of the old concrete to help it bond with the new mix. Concrete bonding solves this problem by using specific materials to allow new and old concrete to stick together to give one solid concrete unit.
There are two concrete slab repair methods of bonding fresh Portland cement concrete to existing concrete
Mechanical concrete bonding
Mechanical concrete bonding uses physical forces to ensure the two sets of concrete adhere to each other.
Specific processes of mechanical concrete bonding include:
Roughening up the surface
Use a hammer and a wire brush to break and roughen up the surface of the old concrete. This creates a rough texture for the new concrete to grip onto.
Grooving
Use a concrete saw to groove the existing concrete surface. This creates channels for the new concrete to enter and interlock with to facilitate sticking together.
Making a scratch coat
Mix a small amount of the repair product with water to a soupy consistency. Then use it to smear the old surface. It creates a rough texture to facilitate bonding.
It also moistens the old concrete, preventing it from absorbing water from the new concrete mix too quickly.
Chemical concrete bonding
Chemical concrete bonding involves applying a liquid bonding agent on the surface of the old concrete to help it bond with the new mix.
For best results, when the bonding agent is tacky, apply a scratch coat. Then apply the repair material.
How to fix cracks in concrete slab repair methods for foundations
When your foundation cracks, you’ll want to patch it up quickly as an important concrete slab repair method. Even if they are non-structural cracks that pose no threat to the structural integrity of your house, they may leak water into your house.
You can use the epoxy injection technique to repair these concrete slab foundation cracks in six simple steps:
1 Step: Clean the crack.
2 Step: Place the injection port along the crack.
3 Step: Use a sealer on the crack’s surface to prevent the epoxy from escaping.
4 Step: Inject the epoxy into the crack via the injection ports, starting from one end and working to the other.
5 Step: Knock off the injection ports after the epoxy hardens.
6 Step: Smoothen the surface.
DIY concrete slab repair methods for simple concrete problems
Sometimes it’s best to just call in the pros. A professional concrete installer and repairer will have a wider variety of concrete slab repair methods to not only fix the problem but also identify what caused it and offer advice on how to prevent it from happening again.
For example, for concrete slab repair methods, you can use:
- Concrete moisture meters for fixing moisture problems
- Concrete slab grabbers for elevated slabs that need extra support
- AMS sub-slab GVP installation kit to assess vapor intrusion in building foundations.
However, there are do-it-yourself (DIY) concrete repair methods for simple concrete problems.
The routing and sealing concrete repair technique can help you repair fine cracks as well as relatively large cracks in 5 simple steps:
- Use a hammer and chisel to open up the crack into a “V” shape.
- Clean up the crack using a wire brush.
- Mix up your concrete patching compound and use it to fill the crack.
- Once the compound is level with the surrounding concrete surface, smooth it out.
- Allow the patching material to cure
Takeaway: Concrete slab repair methods prolong the lifecycle of your concrete project
While concrete is a tough material, it ages with time and gets damaged. Cracking, scaling, and settling are some of the most common concrete damages.
Thankfully, there are different ways to fix concrete damages to restore the integrity of your concrete works.
The concrete slab repair methods above will help you fix different concrete damages.
However, successfully carrying out any repair process to restore your concrete slab requires having reliable equipment and supplies. This is where Certified Materials Testing Products come in!
We offer a wide range of construction materials testing equipment guaranteed to give accurate readings. We are the ultimate plug for lab supplies and testing equipment for cement, concrete, aggregate, asphalt, and soil testing.
Related Blogs for Concrete Slab Repair
Creating Durable Custom Concrete Molds for Your DIY Projects
Protection with Waterproof Epoxy Glue: Your Bonding Solution
Crack Measurement in Concrete: A Complete Guide to Accurate Results


