


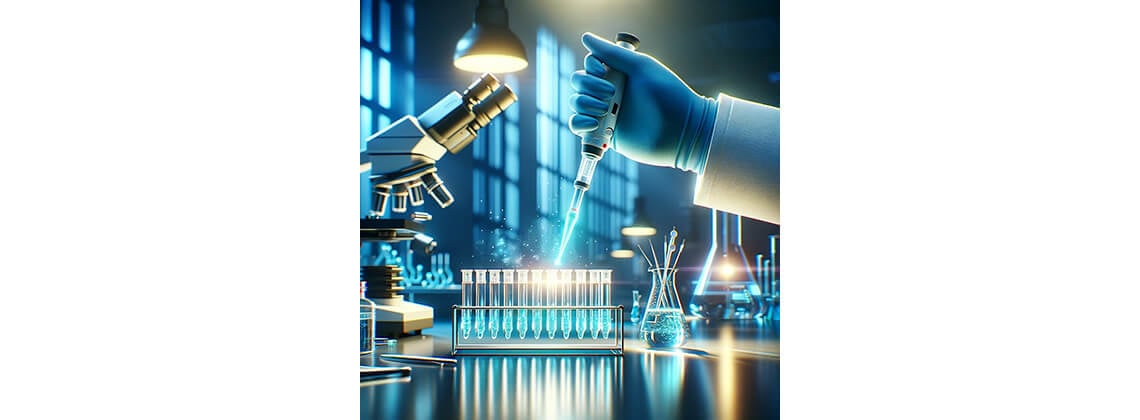
Efficient and accurate micropipette use is a cornerstone of lab work. This article directly addresses “how to use micropipette”, guiding you through best practices for ensuring precise volume measurement and transfer. No fluff, just the essentials you need for confident and reliable pipetting in your daily laboratory activities.
Key Takeaways
- Learning how to use micropipette is essential laboratory tools designed for the precise and accurate transfer of microliter volumes of liquid; they come in different types like air displacement, positive displacement, and electronic micropipettes with single or multi-channels for various applications.
- Proper technique, including controlled plunger pressure, along with regular maintenance and calibration following ISO 8655 standards, are key to the reliability and accuracy of micropipettes in laboratory settings.
- Selection of the appropriate micropipette for a lab’s needs depends on factors like volume precision, tip compatibility, ergonomic design, and frequency of use; and recognition of market leaders like Eppendorf and Gilson can inform purchasing decisions.
Understanding How to Use Micropipette: A Primer

Micropipettes are tailor-made for the accurate and precise transfer of liquid volumes in the microliter volume range. These precision instruments have become indispensable in laboratories, enabling tasks that require exact liquid handling, including:
- Conducting ELISA tests
- DNA amplification
- Kinetic studies
- Experiments in genetics, cell culture, and biochemistry
Among the benefits of discovering how to use micropipette is the reliable dispensation of precise liquid quantities, which ultimately helps boosts lab efficiency.
Types of Micropipettes
Micropipettes operate based on two main principles: air displacement and positive displacement, each catering to specific lab needs. Air displacement micropipettes utilize a piston to displace air, drawing up liquid, whereas positive displacement micropipettes involve direct contact of the piston with the liquid. For those seeking an automated option, electronic micropipettes offer a solution, automating the aspiration and dispensing process via button controls.
Further categorization of micropipettes is based on volume sizes, types and channels. Fixed volume pipettes dispense a set volume while variable volume pipettes allow for adjustment within a specified range. Single-channel micropipettes, equipped with one channel, are ideal for individual samples. However, for high-throughput tasks like plate filling, multi-channel pipettes that handle multiple samples simultaneously are the go-to choice.
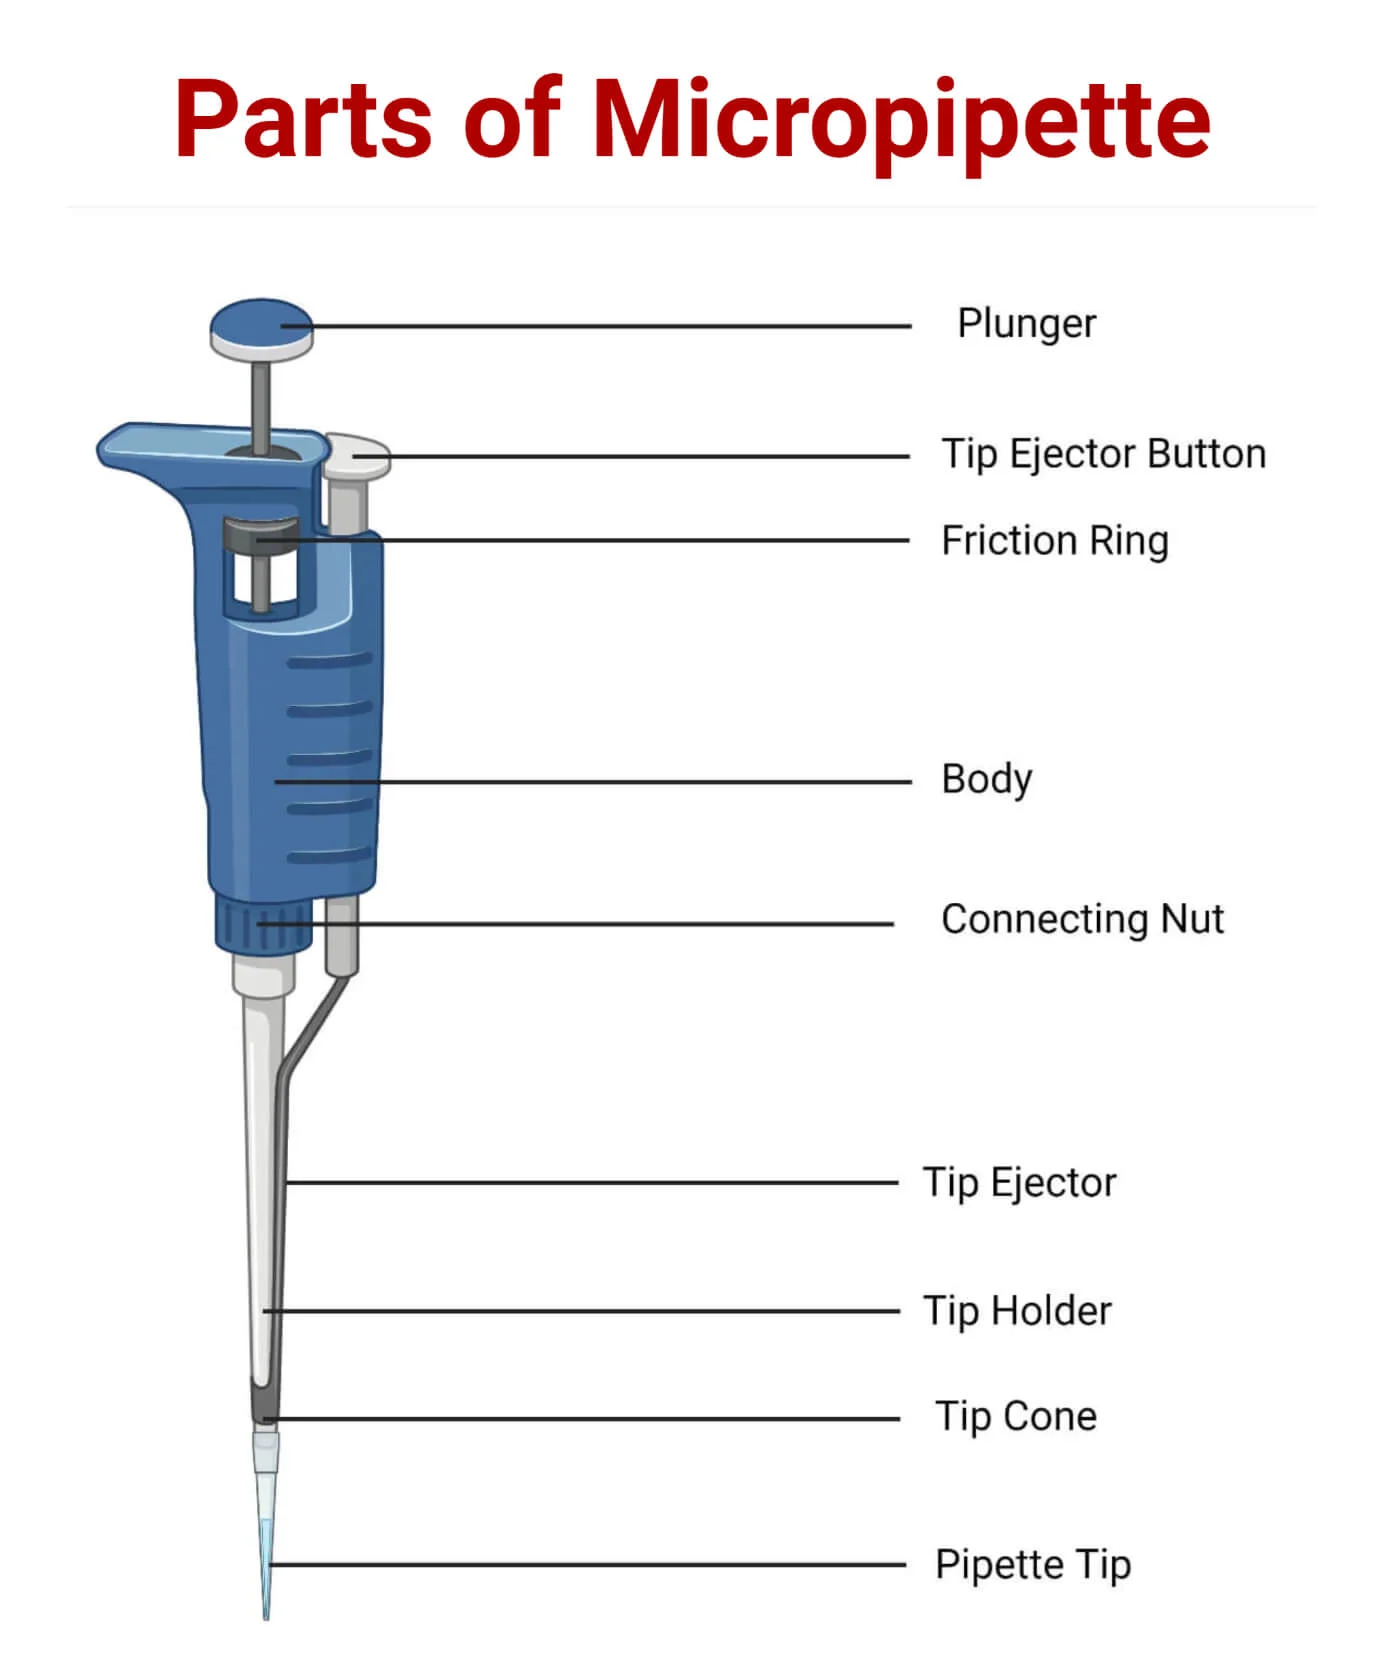
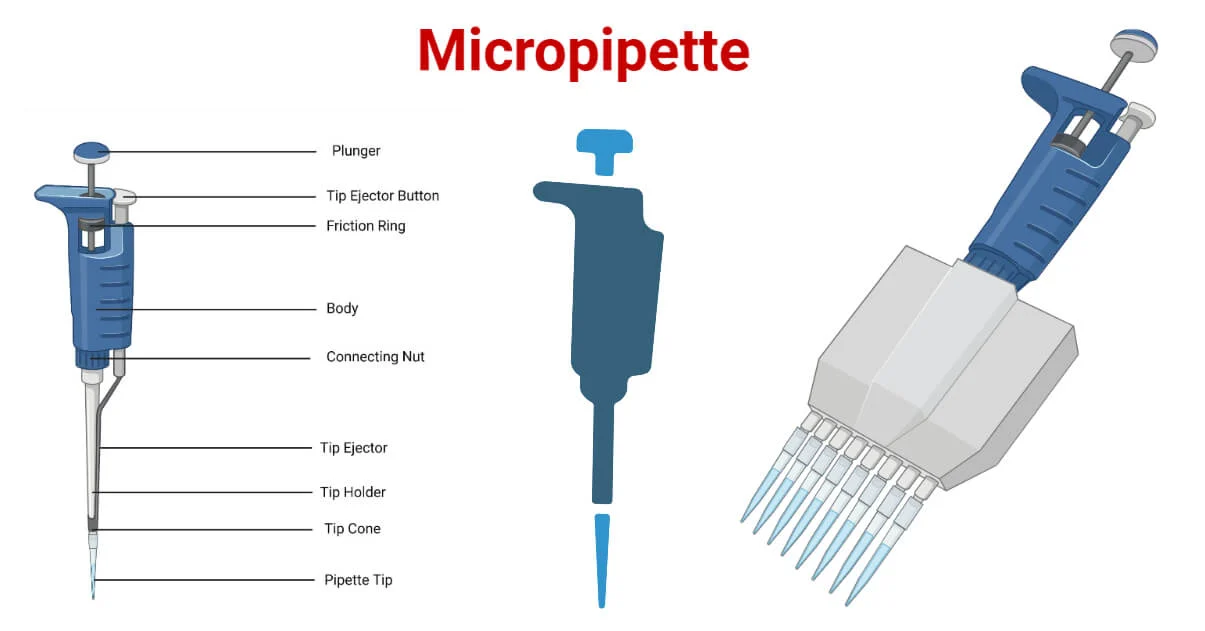
Key Components of a Micropipette
The efficient operation of a micropipette depends on understanding its integral components. Let’s start with the digital volume display window, which allows you to see the set volume to be aspirated or dispensed. On adjustable micropipettes, the same volume display and adjustment knob helps you set the desired volume, a feature absent on fixed volume micropipettes.
The key components of a micropipette are:
- Increment setting: Determines the smallest possible volume adjustment for precise measurements.
- Tip cone: Ensures secure attachment of pipette tips for accurate liquid handling.
- Plunger: Controls liquid aspiration and dispensing with two stops.
- Ejector arm and tip ejector button: Facilitate the discarding of used pipette tips.
These parts work together to ensure accurate and efficient liquid handling.
Step-by-Step Guide to Using a Micropipette
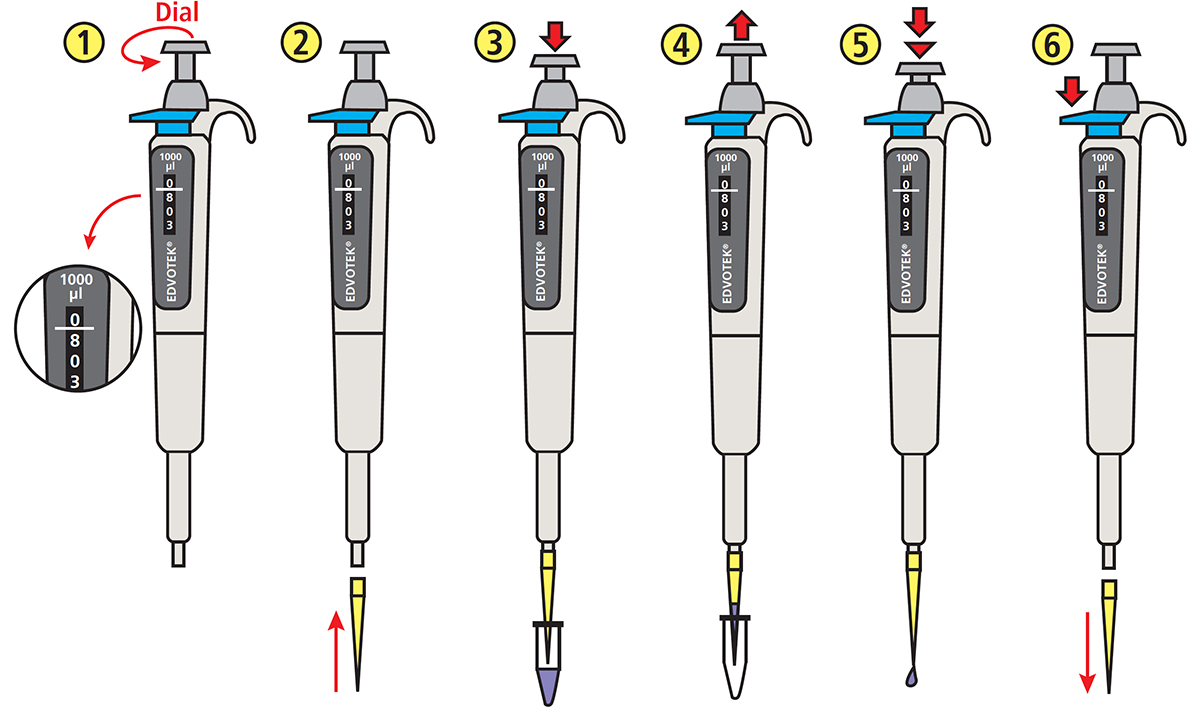

How to use micropipette helps lab functions on a simple principle: pressing and releasing the plunger to aspirate or dispense liquid. But mastery lies in the finesse of operation. Controlled pressure applied to the plunger and its gentle release are key to drawing up and dispensing the desired volume.
Uncontrolled release of the pipette plunger often leads to measurement inaccuracies by causing less draw-up and dispensing of liquid. Hence, employing a consistent and controlled technique with the plunger is indispensable for accurate and reliable pipetting results.
Preparing Your Micropipette
The first step is to use a micropipette and prepare it for use. This involves selecting pipette tips of appropriate quality and form, crucial for precise liquid handling and contamination avoidance. Once a pipette tip part is chosen, it needs to be securely attached to the pipette shaft, ensuring a tight fit that prevents leakage or contamination.
Next, adjust the volume as required by the specific assay protocol before starting the pipetting tasks. Though not covered in detail here, a properly calibrated micropipette is critical for reliable results. Regular calibration checks can significantly enhance the accuracy of your measurements.
Pipetting Techniques
Pipetting techniques can be classified into forward and reverse. In forward pipetting, the operating button is pressed to the first stop, followed by tip immersion into the solution, and slow release of the button to aspirate the liquid. After aspiration, any excess liquid is removed by touching the tip against the reservoir’s edge. Dispensing requires a steady and gentle press of the operating button to the second stop, ensuring the tip is emptied.
For dispensing reagents or solutions with high viscosity or for very small volumes, the reverse pipetting technique comes into play. Here’s how it works:
- Set the pipette to the desired volume before starting.
- After dispensing, a small volume of liquid is left in the tip.
- Blow out the remaining liquid into a separate container.
- Dispose of the tip.
Tips for Accurate Measurements
Accuracy in measurements is paramount in lab work. One of the key factors influencing this is using the micropipette within their designated volume limits. Forcing pipette tips into the pipette shaft can lead to breakage and incur additional costs for repairs.
When it comes to handling heterogeneous samples, special preparation is needed, such as mixing the sample with the pipette tip immersed and using repetitive pressing and releasing to the first stop until complete tip clearance. As for pipetting rhythm and speed, uniformity is the key. This prevents aerosol formation, avoids contamination, and minimizes sample volume loss.
Remember, opting for the smallest pipette that can handle the desired volume enhances precision, especially since accuracy falls about 2 20%off when the volume set is near the pipette’s lower volume range.
How to Use Micropipette: Maintenance and Calibration

Similar to other precision instruments, micropipettes need regular maintenance and calibration for accurate and precise pipetting results. By sticking to a proper calibration schedule, you can maintain high standards of reliability and repeatability, adhering to industry-specific guidelines and enhancing how to use micropipette.
Regular maintenance and calibration not only enhance the pipette’s lifespan and reliability, but also reduce the frequency of replacements, leading to long-term cost savings. It’s worth noting that proper electronic micropipette calibration requires specific ambient conditions as per ISO 8655 and should be validated after each cleaning process.
When to Calibrate Your Micropipette
The frequency of micropipette calibration largely depends on its usage. For normal use, calibration every 3 or 6 months is recommended, while at least once a year is the standard according to ISO 8655. However, for micropipettes used daily or for high-volume or high-accuracy applications, more frequent calibration is necessary.
In today’s digital age, systems like FLUICS CONNECT can be used to track calibration status and set reminders for upcoming calibrations, ensuring you never miss a calibration. By establishing an appropriate calibration frequency, you can minimize the chances of incorrect liquid delivery and ensure confidence in results.
How to Calibrate a Micropipette
Calibrating a micropipette involves several steps. It begins with bringing distilled water to room temperature and measuring its temperature with a thermometer. An empty, clean beaker is weighed on a precision balance to establish a baseline for later measurements.
First, fill the micropipette to the set calibrated volume with the prepared distilled water, ensuring no air bubbles are present. Then, dispense this water into the beaker, repeating the process 5-10 times for consistency and reliability. Average the results from these tests to establish an average weight for calculating the dispensed volume.
Next, calculate the actual volume dispensed using the obtained weight of water and a conversion factor that considers water density. Evaluate the accuracy of the micropipette by comparing the volume it dispenses to the set volume. Remember, calibration of the micropipette must adhere to ISO 8655-2 standards, which specify permissible error limits based on the micropipette’s volume classification.
Selecting the Right Micropipette for Your Lab

Several considerations come into play when choosing the right micropipette for your lab. Micropipettes with smaller volume ranges generally offer higher precision, a crucial factor when dealing with low-volume liquid transfers. Another important aspect is tip compatibility. Selecting a micropipette that is compatible with universally available tips can be more cost-effective and offers greater convenience.
You should also look for features such as a digital volume display, lightweight design, and a comfortable grip, as these enhance ease of use and reduce hand strain during pipetting. Consider the specifics of the experiments to be conducted before choosing a micropipette, as factors like the volume to be handled and the quality of the tips can influence the decision.
Numerous brands have distinguished themselves in the micropipette market, such as:
- Eppendorf
- Gilson
- Thermo Scientific
- Sartorius Biohit
- Scilogex
These brands have emphasized ergonomic designs in their pipettes of various sizes, which shows their commitment to ensuring user comfort and minimal exertion.
Certain brands, such as Eppendorf and Sartorius Biohit, have incorporated specific safety features like Safe-Cone Filters to minimize sample contamination and designs to prevent repetitive strain injuries (RSIs). The Finnpipette F1 from Thermo Scientific and Sartorius Biohit’s mLINE, for example, offer various operating modes and lightweight design to enhance lab efficiency and ease regular pipetting tasks.
Features to Look for in a Micropipette
There are several key features to consider when purchasing a micropipette so that the lab worker can master how to use micropipette. High-quality pipettes and tips designed to work together ensure secure connections and prevent issues such as leaking or tips falling off. Ergonomic factors such as lightweight design, low tip loading, and ejection force, along with a comfortable grip and easy volume adjustment, are essential for user comfort and injury prevention.
Micropipettes with volume adjustment locks provide enhanced precision and reliability by preventing inadvertent volume changes during pipetting. And don’t overlook the convenience of color coding. It simplifies the pairing process, ensuring correct use and minimizing pipetting errors.
Applications of Micropipettes in Various Fields
Micropipettes’ wide range of applications across various fields demonstrates their versatility. In molecular biology laboratories, micropipettes are indispensable for techniques such as polymerase chain reaction (PCR) and western blotting.
Micropipettes play a vital role in immunological research, accurately titrating antigens and antibodies for critical experiments and in serological testing where precision is vital. In chemical laboratories, micropipettes aid in handling complex samples, including those that are volatile and viscous, ensuring precise measurement and handling.
For applications such as ELISA, molecular screening, and kinetic studies in medical testing, multichannel micropipettes come highly recommended. Furthermore, pharmaceutical laboratories employ micropipettes during quality control assessments to ensure the accuracy and reliability of pharmaceutical products.
Summary
So, we have discovered how to use micropipette and its essential feature in all lab work. Micropipettes, with their precision and versatility, have revolutionized laboratory work. From their design and functionality to the techniques and tips for their use, understanding micropipettes is a critical skill for anyone working in a lab setting. Regular maintenance and calibration ensure their longevity and reliability. With a plethora of options available, choosing the right micropipette for your lab can be daunting but knowing what to look for can simplify the process. Micropipettes continue to find applications across various fields, underscoring their indispensability in today’s labs.
Certified MTP has an elite selection of lab solutions, Measuring Pipette, Mohr Type Measuring Pipettes, showcasing industry-leading brands including Flasks, Beakers, Pipettes, & Graduated Cylinders, Erlenmeyer Flasks, Measuring Pipettes, Stainless Steel Beakers, Glass Graduated Cylinders, and Plastic Graduated Cylinders.
Frequently Asked Questions
What are the steps of using a micropipette?
When using a micropipette, first select the volume and set the plunger tip, then press the plunger to the first stop, place the tip in the liquid, and slowly release the plunger. Afterwards, insert the tip into the delivery vessel and depress the plunger to the second stop to dispense the liquid.
How to use micropipette for volume?
How to use micropipette, one must set the appropriate volume, place a clean tip on the micropipette, press the plunger to the first stop to draw the sample, and slowly release the tip ejector plunger to expel the liquid. Be sure to submerge the tip just past the level of the pipette.
What is the range of a P200 micropipette?
The range of a P200 micropipette is between 20 ul and 200 ul, with its maximum volume being 200 ul. It is accurate for volumes that range between 20 ul and 200 ul.
What are some of the primary uses of micropipettes in the lab?
Micropipettes are primarily used in the lab for precise liquid handling in tasks such as ELISA tests, DNA amplification, kinetic studies, genetics, cell culture, and biochemistry experiments. These devices are essential for maintaining accuracy and consistency in the lab.
What is the difference between forward and reverse pipetting techniques?
How to use micropipette and the main difference between forward and reverse pipetting techniques is the order of aspiration and dispensing of the liquid. Forward pipetting aspirates liquid first and then dispenses, while reverse pipetting dispenses first, leaving a small volume in the tip, which is aspirated and then blown out into a separate container.
Related Blogs for How to Use Micropipette
Comprehensive List of Biology Laboratory Equipment in 2023
Chemistry Glassware Names: A Comprehensive Guide
Understanding Air Condenser Chemistry in 2023
Suction Filtration: The Basics of Vacuum Filtration
What is a Graduated Cylinder Used For?
Most Accurate Glassware for Measuring Volume
All About Volumetric Flask: Uses, Function & Overview
Aspirator Flask: Benefits of Borosilicate Glass Filter Flask
Everything You Need to Know About Beakers in Chemistry
Pipette or Measuring Cylinder: Tools for Liquid Measurements
Measuring the Volume of Liquid: Tips, Tools, and Techniques
Understanding What Are Pipette Tips Used For
Top-Quality Chemical Glassware for Precision Lab Work
Guide to Pipettes: Functions, Types, and Usage Tips
How Many Ounces in a Gallon [Conversion Solved]
Convert Inches Cubed to Feet Cubed [Easily Solved]
Calculate the Wt of Water per Cubic Foot: Quick Guide
Convert Cu Ft of Water to Gallons [Effortless Guide]
Advantages of Mohr Pipette: Precision Measuring Simplified
Best Graduated Cylinder for Accurate Measurements
How Erlenmeyer Flask is Used for Laboratory Applications
Exploring Precision of 100 ml Graduated Cylinder
25ml Graduated Cylinder Choices: Measuring Simplified
Best Volumetric Pipette Bulb: Master Precise Liquid Handling
Price of Micropipette: Cost Guide for Lab Essentials
Mastering Micropipetting: Techniques for Lab Work
How to Read Micropipette Volumes Accurately
Pipette Tip Selection Guide for Precise Lab Measurements
What Are Pipettes: Tools for Precision Liquid Handling
Mohr Pipette Use in the Lab: Accurate Liquid Measuring
Best Pipette Website for Lab Needs – Quality & Precision
Choosing the Best Transfer Pipets for Your Lab Needs
Pipette vs Pipet: Uncovering Differences for Lab Accuracy
Pipetted: Master the Art of Precise Liquid Handling
Flawless Pipetting: Mastering Strategies for Precision
Graduated Pipette Use: Tips for Accurate Lab Measurements
Top Quality Pasteur Pipettes for Precision Liquid Handling


