


Are you involved in asphalt testing and looking for the best way to assess the quality and durability of hot-mix asphalt specimens? The solution lies in using a Marshall Breaking Head! In the dynamic world of asphalt testing, Marshall Breaking Heads have emerged as the go-to equipment for assessing deformation under load and flow rate of hot-mix asphalt specimens.
In this insightful blog post, we will unravel the secrets of Marshall Breaking Heads, exploring their design, function, and application in real-world scenarios. By the end, you will have a comprehensive understanding of how to choose, set up, and use a Marshall Breaking Head for accurate and reliable asphalt testing.
Key Takeaways
- Marshall Break Heads are precision testing apparatus designed to meet ASTM requirements and evaluate asphalt stability and flow.
- Essential components for accurate testing include upper & lower segments, load frames, guide rods, size selection based on test requirements & sample size.
- Real-world applications have proven successful with numerous success stories attesting to the reliability & accuracy of the Marshall Break Head.
Understanding Marshall Break Heads

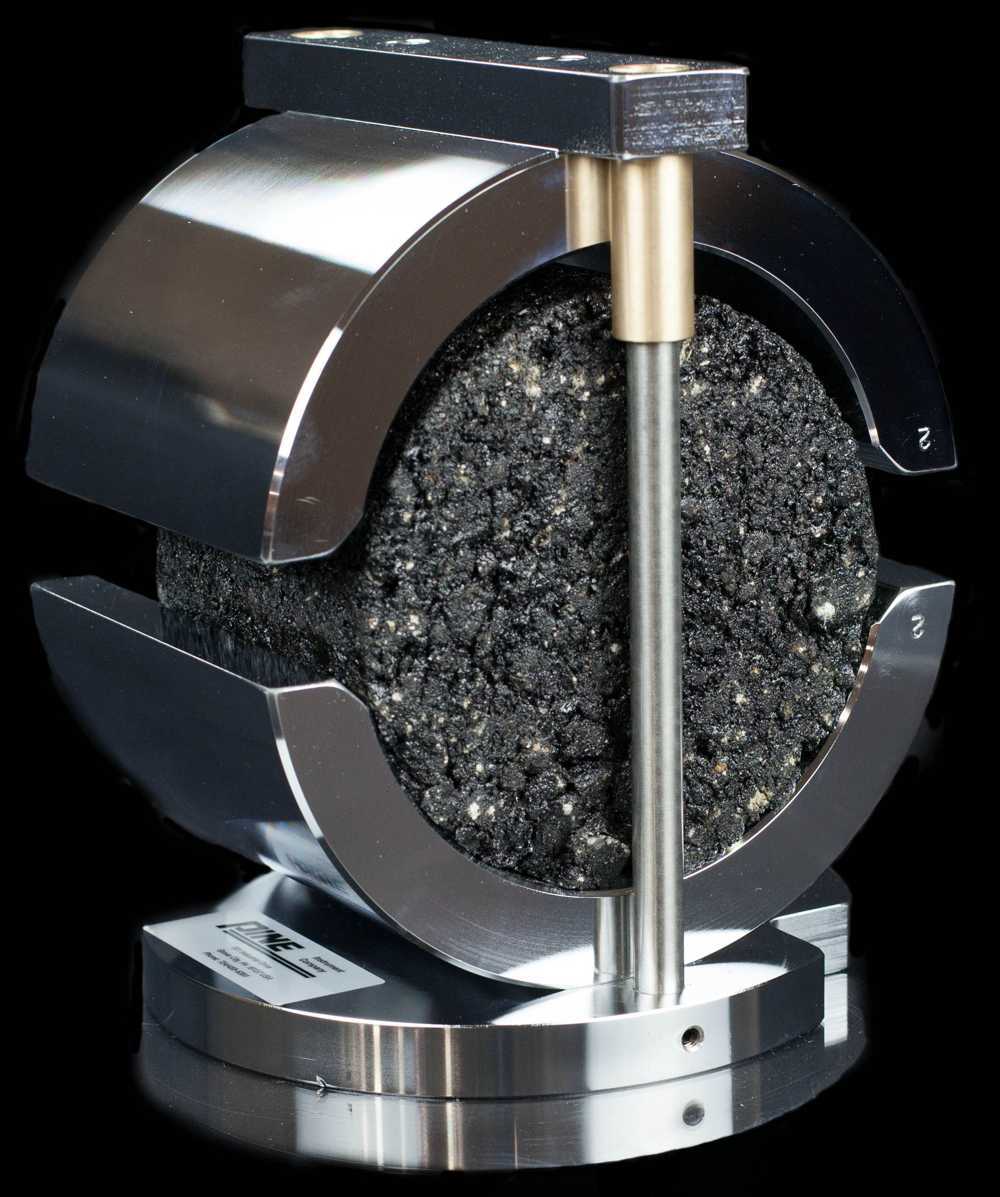
Marshall Breaking Heads assess the deformation under load and flow rate of hot-mix asphalt specimens with precision. You can seamlessly integrate these breaking heads into your testing setup, as they are compatible with various load frames, including those from other manufacturers. Designed for efficiency, they ensure accurate and reliable results in every test. Their versatility and compatibility make them an essential component of any asphalt testing system.
A deeper insight into the model and its critical components will illuminate the intricacies of Marshall Breaking Heads.
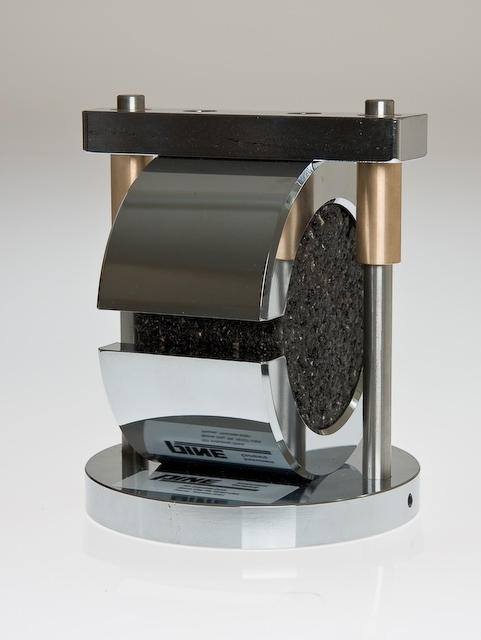
The Marshall Break Head Model

The Marshall Breaking Head model comprises:
- Upper and lower cylindrical segments, each with a precisely machined inner cylinder face
- These segments are strategically placed in load frames to evaluate the stability and flow of the asphalt
- The lower segment is affixed to a base
- The upper segment is placed on the specimen during testing
Boasting precision guide rods, low-friction sleeves, and availability in 4 or 6-inch specimen sizes, the Marshall Break Head model offers the following features:
- Accurate testing
- Easy input and storage of specimen information for efficient data management
- Designed to meet ASTM requirements
- Constructed from durable materials that guarantee performance and reliability
Upper and Lower Segments
The upper and lower segments play crucial roles in the breaking head assembly, with the upper segment responsible for ascertaining the Marshall stability and flow values of asphalt concrete. Meanwhile, the lower segment connects to the upper segment through vertical guide rods with low-friction sleeves, enabling precise and controlled movement during the breaking process.
These segments are securely connected using vertical guide rods, precisely machined to fit asphalt specimens perfectly. Recognizing the significance of these segments in the breaking head assembly will lead to accurate and reliable testing results.
Keep Reading: Saws for Concrete: Power Through Projects with Precision.
Marshall Break Head Accessories

Marshall Break Head accessories, such as load frames and guide rods, play a critical role in ensuring accurate testing results. Exploring the diverse accessories compatible with the breaking head will enable you to optimize your testing setup for dependable results.
The following sections will highlight the significance of load frames and guide rods, along with the items included with the breaking head for effective testing.
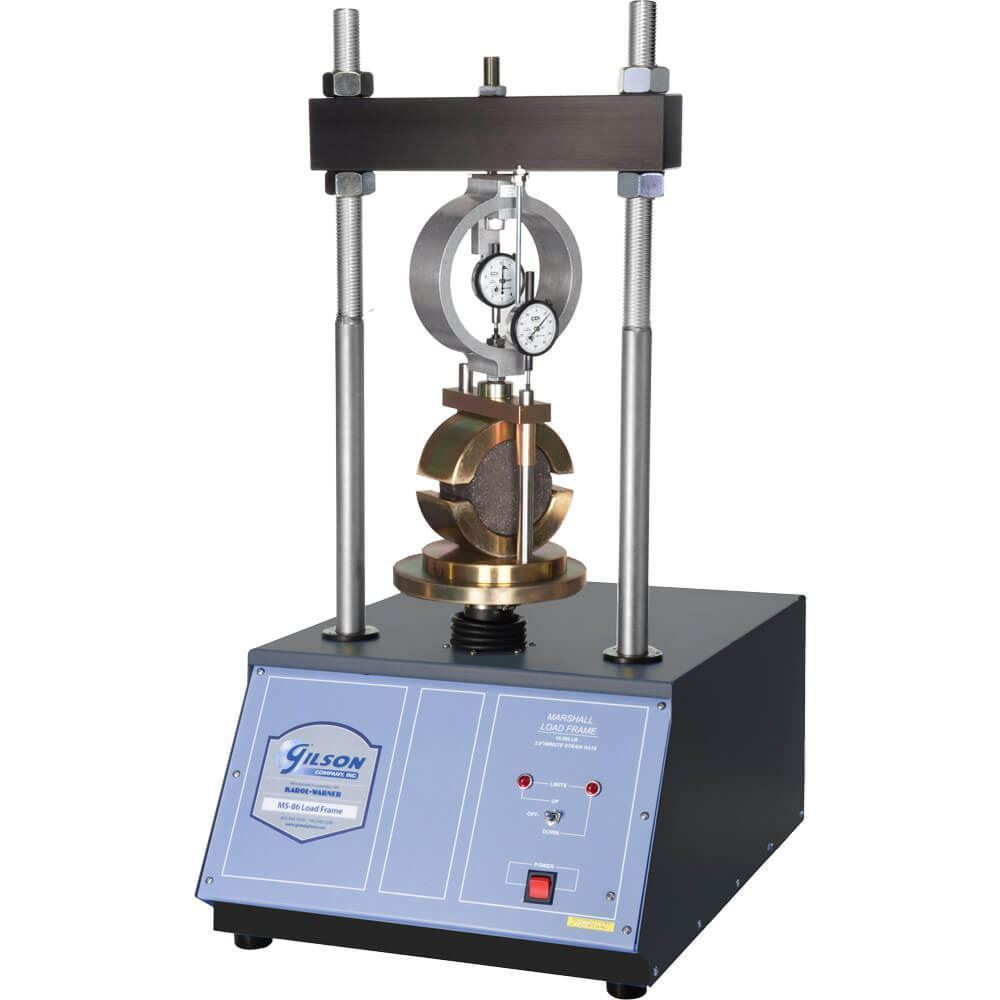
Load Frames and Included Items
Load frames included items, such as the ms 26 model, provide the necessary force and stability for conducting the Marshall test, which assesses the resistance to the plastic flow of bituminous paving mixtures. Available in various types, load frames ensure consistent loading rates throughout the test, with load frames including items essential for accurate results.
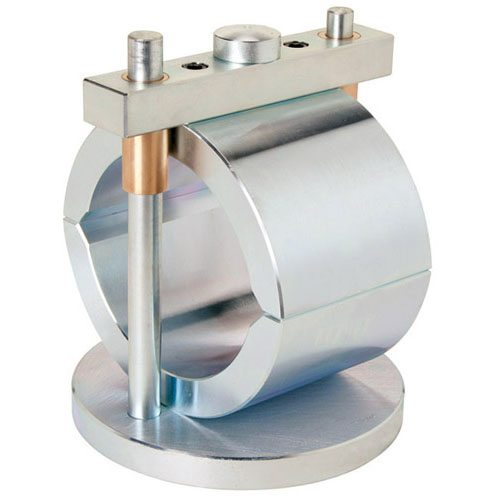
The components typically included with a Marshall Breaking Head are:
- Upper and lower cylindrical segments
- Precision-machined sleeves and segments that reduce friction, ensuring accurate loading
- Compatibility with most load frames for easy integration and reliable test results.
Guide Rods and Their Importance
Accurate testing relies on guide rods, which provide stability and alignment for the specimen being tested. These rods connect to the upper and lower segments of the broken head, ensuring even and correctly directed force application. This results in accurate and reliable test outcomes.
Regular inspection of guide rods is necessary to detect any signs of wear or damage, with any issues addressed by replacing the guide rods for optimal accuracy and reliability. Lubrication may also be necessary to reduce friction and ensure smooth movement of the guide rods.
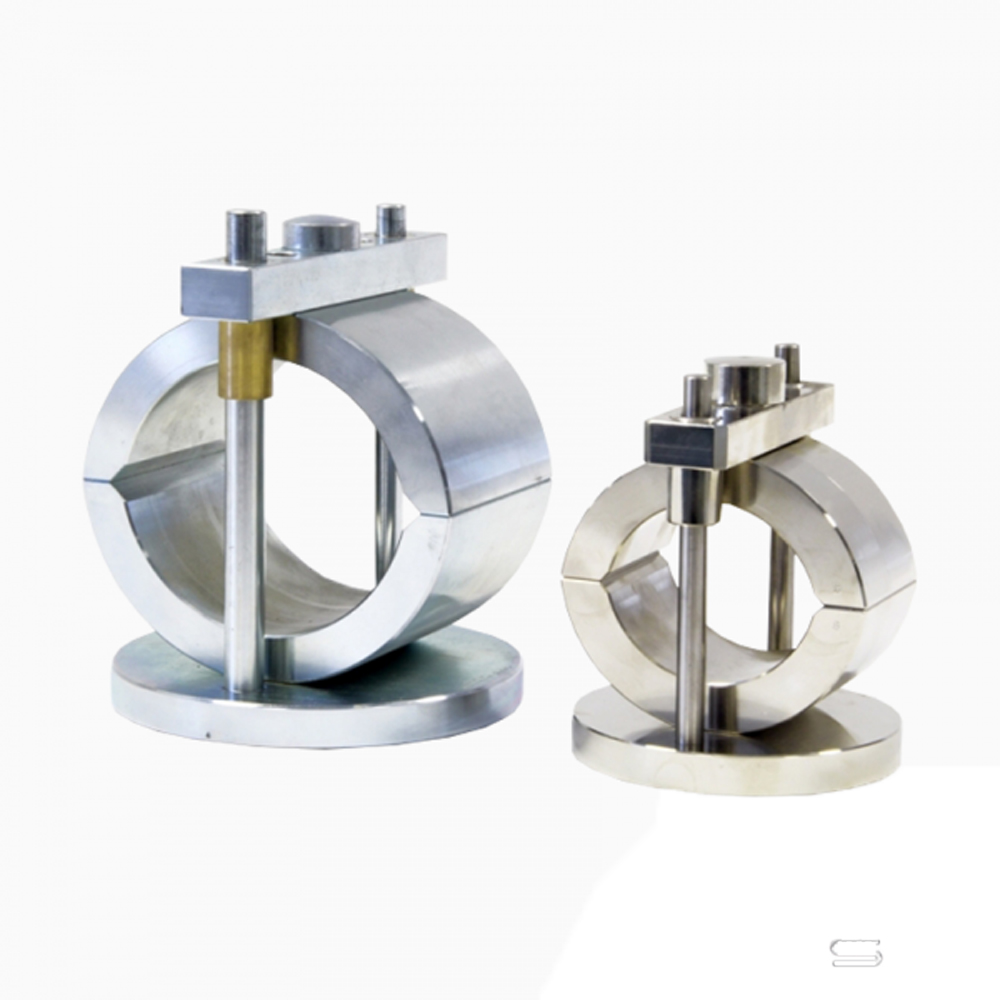
Product Dimensions and Specifications

The dimensions and specifications and product dimensions of these are vital for ensuring compatibility with your testing setup. Available in 4” and 6” sizes, the upper and lower cylindrical sections of the Marshall Break Head have a 2” and 3” radius, respectively.
Choosing the right size of the breaking head segment is key to ensuring accurate and reliable test results. When choosing this, it’s crucial to consider the size of the samples being worked with as different sizes of the breaking head segment may be tailored to specific testing requirements or equipment specifications.
More Reading: Concrete Strength: Unraveling the Mystery of PSI.
How to Choose the Right Break Head for Your Needs
Selecting the right break head model for your needs involves considering various factors, such as:
- The size of the samples
- The quality and durability of the construction materials
- The inside radius for the sample size
- The scale of the project
- The budget
These factors play a significant role in determining the most suitable breaking head.
Evaluating these factors and balancing them against the specific needs and requirements of the testing application will guide you to an informed decision and help select the best-suited breaking head model for your project.
Setting Up and Using Your Marshall Break Head
Correct setup and usage of your Marshall Break Head are pivotal in achieving accurate and reliable testing. Begin by ensuring that the guide rod and guide sleeve are properly assembled, with the larger guide sleeve in the upper segment.
Once the breaking head is assembled, it is ready for use. Ensure that the brake head is calibrated following the requirements and frequency outlined in the relevant calibration and testing standards. This will ensure the utmost accuracy during testing.
Troubleshooting Common Issues
Common issues that may arise during the use of the break head include:
- Blown fuses
- Broken solder joints
- Unresponsive footswitches
- Overheating components
When confronting these issues, it’s imperative to resolve them swiftly to create and maintain accurate and reliable real-time test data.
If the load frames of the Marshall Break Head are not functioning properly, follow these steps:
- Inspect the load frame for any shipping damage.
- Remove the load frame from the pallet.
- Set the crossbar to the appropriate height.
- If the issue persists, further troubleshooting may be necessary.
Purchasing and Support Options
There are various purchasing and support options available for your breakhead, including online ordering and customer support. By exploring these options, you can ensure a seamless purchasing experience and have access to the necessary assistance when needed.
The upcoming sections will elaborate on the account creation process, online ordering features, and ways to sign in, along with reaching customer support for assistance with your breaking head during business hours.
Creating an Account and Ordering Online
To create an account for purchasing a Marshall Break Head, follow these steps:
- Visit the website of the manufacturer or distributor.
- Look for options such as ‘Register’ or ‘Create an Account’.
- Click on the option and fill out the required information.
- Once you have successfully created an account, you can proceed with the purchasing process.
While purchasing a Marshall Break Head online, the payment options may vary depending on the website or store you select. It is recommended to visit and contact the specific website or contact the seller directly to inquire about the available payment options.
Contacting Customer Support
If you require assistance with your breakhead, there are several customer support options available. These may include:
- Creating a support ticket on the manufacturer’s website
- Accessing product information and help articles on the manufacturer’s website
- Contacting the manufacturer directly via phone
When contacting customer support for Marshall Break Heads, provide your contact information, including your name, email address, and phone number, as well as details about the issue or question you have regarding the two heads product. This will ensure that the customer support team can effectively address your concerns and provide the necessary assistance.
Real-World Applications and Success Stories

Marshall Break Heads have been utilized in various real-world applications, such as:
- Asphalt testing for infrastructure projects
- Assessing the strength and stability of hot-mix asphalt specimens
- Empowering the enhanced design and testing of bituminous materials using this.
Success stories of those who have used break heads for their testing needs demonstrate the reliability and accuracy of this equipment. Case studies have recommended the Marshall method, which involves the use of this, for its simplicity and rapid and effective testing. These success stories serve as a testament to the capabilities of Marshall Breaking Heads in material testing.
Summary
In this blog post, we have explored the world of Marshall Break Heads, delving into their design, function, and application in real-world scenarios. We discussed the importance of understanding the model and its components, as well as the significance of accessories like load frames and guide rods. By examining the dimensions and specifications of the Marshall breaking head model, we have ensured compatibility with your testing setup.
In your journey of asphalt testing, choosing the right breaking head model and proper setup are vital. Addressing arising issues is equally crucial for accurate results. This blog equips you with knowledge for informed decisions. Succeed in your testing endeavors armed with these insights.
Certified MTP has an elite selection of Mix Marshall Design tools and equipment, showcasing industry-leading brands for Marshall Stability Test Systems, Marshall Compactor Test Equipment and Molds, Marshall Water Baths for Asphalt Testing, and Sample Ejectors for Asphalt Extrusion.
Frequently Asked Questions
What does Marshall JMP stand for?
Marshall JMP stands for Jim Marshall Products, which is the company’s label for their line of amplifiers and other music-related products. It was introduced in 1975 when they introduced created the first “master volume” amps.
Can you use a Marshall head without a cabinet?
You should not use a Marshall head without attaching a speaker cabinet to it, as the cabinet will act as the load resistance needed for the amp head.
What is the purpose of a Marshall Break Head?
A Marshall Break Head is an important tool for measuring asphalt performance under load and flow rate, allowing for optimization of asphalt paving properties.
How do guide rods contribute to accurate testing?
Guide rods offer stability and alignment for the specimen, allowing the force to be applied evenly and in the desired direction, resulting in accurate testing.
What factors should I consider when selecting a breakhead model?
When selecting a breaking head model, you should consider the size of your samples, the quality and durability of construction materials, the inside radius for the sample size, the scale of your project, and your budget.


