


Confused by the digits on a micropipette’s display? You’re not alone. Learning how to read micropipette volumes is a fundamental skill for accurate scientific measurements. This article offers a clear, concise guide that will help you understand and interpret these numbers with confidence, ensuring your experiment results are precise and reliable.
Key Takeaways: How to Read a Micropipette
-
Micropipettes come in various sizes for specific volume ranges. Use them within their limits to ensure accuracy and prevent damage. This helps technicians learn how to read micropipettes.
-
A micropipette’s 4-digit display is crucial for setting precise volumes. Each digit represents a different place value, and features like sub-increment pointers aid in precision.
-
Proper pipetting technique involves selecting the correct volume, using an appropriate tip, and aspirating and dispensing with precision. Regular maintenance and calibration are essential for maintaining accuracy.
How to Read Micropipette Volume Ranges

Imagine having a finely tuned instrument that can measure and dispense volumes as small as 0.1µL with exceptional accuracy. That’s the power of a micropipette! These precision tools play a key role in transferring small amounts of liquid in countless scientific experiments. Reading the volume at the bottom of the meniscus ensures accurate measurement.
Micropipettes are available in a variety of sizes, each designed for a specific volume range. Common adjustable-volume micropipettes include:
- P10 (1-10 µl)
- P20 (2-20 µl)
- P100 (10-100 µl)
- P200 (20-200 µl)
- P1000 (100-1000 µl)
It’s essential to remember that forcing a micropipette beyond its indicated volume range compromises its accuracy and risks damaging the instrument.
Identifying Your Micropipette’s Volume Range
Learning how to read micropipette that you encounter has a specific volume range, and understanding this is fundamental to accurate measurements. Remember the golden rule: never set your micropipette beyond its maximum volume. Not only does this prevent damage, but it also maintains the integrity of your measurements.
Think of it as the speed limit on a road; exceeding it won’t get you to your destination any faster, but it might just lead to an accident. In the same vein, forcing your micropipette beyond its limits won’t improve your results, but it could certainly compromise them. Using filter tips can help maintain accuracy and prevent contamination.
Matching Volumes with Pipette Sizes
Selecting the appropriate pipette size for your desired volume is much like choosing the right tool for a job. It’s about finding the perfect fit that maximizes accuracy and precision. In general, it’s best to select the smallest pipette capable of handling the required volume.
But what if your volume falls in the middle of a pipette’s range? In such cases, choose a pipette size slightly larger than the total volume of liquid being transferred. This helps optimize performance and prevents inaccuracies that can occur when a pipette’s volume range is too large for small volumes. Remember, micropipettes come in sizes ranging from 0.2 µl to 5,000 µl, there’s an exact match for all your dispensing needs. Reverse pipetting is also a useful technique for handling small volumes accurately.
Deciphering How to Read Micropipette Display
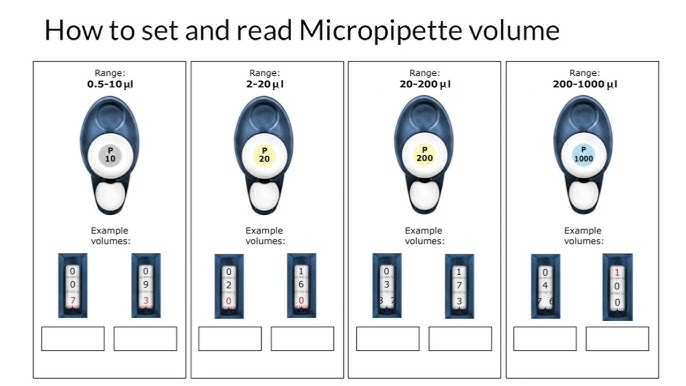

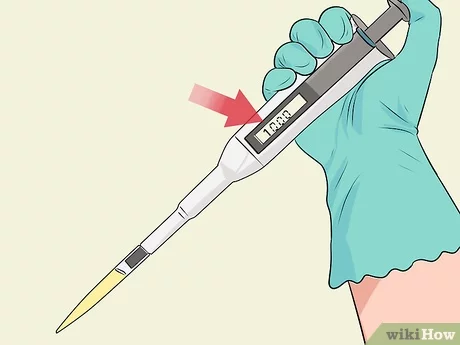
Now that we understand volume ranges and how to select the right pipette, let’s turn our attention to the micropipette’s display. Micropipettes typically feature a 4-digit digital display, where the appearance of the digits depends on the volume range of the one inside the pipette.
For instance, a micropipette designed for volumes of 100-1000 µL presents all four digits. In contrast, micropipettes with larger or smaller volume capacities may not display a digit in the 100th or 1000th place. Some micropipettes even have additional features on their display, like sub-increment pointers for extra precision and color-coded numbers to distinguish different units, further enhancing accuracy in setting volumes. Ensuring the micropipette and liquids are at ambient temperature helps maintain accurate readings.
Understanding the Digit Code
The digit code on a micropipette display is a bit like the secret language of micropipettes. Each of the 4 digits has a unique place to hold a value that represents:
- units
- tens
- hundreds
- thousands
Special techniques may be required for measuring viscous liquids accurately.
Adjusting the pipette volume involves rotating the volume adjustment knob, which changes the digits on the display accordingly and helps discover Learning how to read micropipette.
So, next time you’re adjusting your pipette’s volume, remember you’re not just rotating a knob. You’re speaking the language of your micropipette, telling it exactly how much liquid you want to measure and dispense.
Visual Guide to How to Read Micropipette Volume Settings
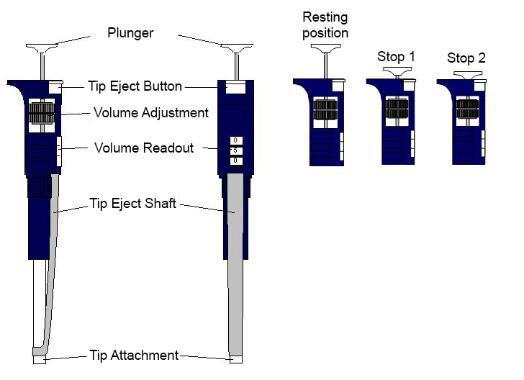
How to read micropipette volume settings on your video micropipette correctly is as crucial as setting them. To set your micropipette to the correct volume, turn the volume adjustment knob until the desired volume aligns with the indicator on the display.
But what about those tiny tick marks at the bottom of some micropipette displays? These sub-increment pointers allow for fine adjustments beyond the main scale, ensuring precise control over the volume of liquid to be dispensed. Remember, precision in setting and interpreting volume on a micropipette’s display is pivotal for achieving accurate results in laboratory procedures. Pre-wetting the pipette tip can help ensure accurate volume settings.
The Pipetting Process: From Aspiration to Dispensation
We’ve explored volume ranges, pipette selection, and deciphering the display. Now let’s dive into the heart of micropipetting – the pipetting process itself. From aspiration to dispensation, each step is a dance of precision and accuracy. Using cone filters can help prevent contamination during the pipetting process.
The process of using a micropipette involves the following steps:
- Select a specific volume on the micropipette and securely attach a clean tip.
- Aspirate the liquid by pressing the plunger to the first stop.
- Submerge the tip into the liquid.
- Slowly release the plunger to draw up a precise volume.
For dispensing, follow these steps:
- Move the pipette tip to the receiving vessel.
- Press the plunger to the second stop.
- Pause for two seconds to ensure complete dispensation of the liquid.
- Eject the tip to prevent contamination.
First Stop, Second Stop: Mastering the Plunger
The plunger of a micropipette is your control center, the driving force behind accurate aspiration and dispensation. It has a resting position and two stop positions – the first stop for accurate volume aspiration and the second stop for complete liquid dispensation. Using Sartorius Safe-Cone Filters can help maintain accuracy and prevent contamination.
To aspirate liquids accurately, depress the plunger to the first stop before immersion and release it slowly to avoid air bubble formation. For dispensing, press the plunger down to the first stop and then proceed to push the second stop. This ensures the ‘last drop’ is released without splashing, thus maximizing precision.
Achieving Precision: Tips on Handling Liquids
Handling liquids with precision is an art, requiring skill, technique, and a few handy tips. For instance, holding the pipette vertically and immersing the tube tip properly during aspiration can prevent air bubble formation and ensure more accurate measurement. Using tips can help ensure accurate measurements and prevent sample loss.
Using pre-wetting techniques and the reverse pipetting method is recommended to improve accuracy when dealing with viscous or small volume liquids. A pause after aspiration allows complete volume uptake, and positioning the tip against the vessel’s open side uses surface tension to aid in dispensing.
Remember, liquids and pipettes are at ambient temperature before use helps to maintain consistent dispensed volumes, as temperature fluctuations can affect the volume of liquids delivered.
Essential Techniques for How to Read Micropipette

Like any skill, pipetting has its own set of techniques that can significantly enhance accuracy and consistency. From pre-wetting the pipette tip to gently touching off the pipette tip against the container’s side, each technique plays a crucial role in accurate results. Using hydrophobic filters can help prevent contamination and maintain accuracy.
But remember, the most essential pipetting technique is practice. The more you pipette, the better you’ll get. So, keep these techniques in mind, and let’s get pipetting!
Correct Tip Selection and Attachment
Not all pipette tips are created equal. Selecting the right tip is as crucial as adjusting the correct volume. Using tips specifically designed for the pipette being used creates an airtight seal necessary for dependable liquid delivery and ensures accurate results.
Quality of pipette tips in terms of their mold, integrity, and uniformity is crucial to achieving accurate and consistent liquid transfers in pipetting processes. Ergonomically designed pipette tips can reduce the force required for attachment and ejection, helping to prevent repetitive stress injuries.
Preventing Contamination and Sample Loss
Contamination and sample loss are the enemies of any lab worker. Fortunately, with proper technique and precautions, these can be prevented. Always use a new plastic tip for each sample, and dispose of the used tip in a designated waste container with the tip ejector to prevent cross-contamination. Using Sartorius Safe-Cone Filters can help prevent contamination and maintain sample integrity.
Some tips for proper technique include:
- Pre-wetting the pipette tip 2-3 times
- Using a slow and controlled rhythm
- Using filter tips or cone filters for additional protection
- Storing pipettes upright to prevent liquid from entering the pipette body
- Using Sartorius Safe-Cone Filters and tips to sample integrity and reduce the risk when working with pipettes.
Maintaining Your Micropipette
Just like any precision instrument, your micropipette requires regular care and maintenance to function optimally. Regular calibration ensures that the micropipette maintains accurate volume measurements over time, while routine cleaning is vital for its proper functioning and the integrity of experimental results. Using tools like Pipette Wizard can aid in scheduling, tracking, and automating the process.
Providing regular training and assessments for staff on pipetting techniques can mitigate operator errors and improve the accuracy. After all, a well-maintained micropipette is a reliable partner in your research journey.
Calibration: Ensuring Accurate Measurements
Micropipette calibration is like keeping your compass true. It ensures the correct volume of liquid is dispensed for reproducibility and comparability of results across experiments and users. Tools like Pipette Wizard help schedule, track, and automate the process.
Calibration can be challenging due to its nature and potential for human error. However, modern tools like Pipette Wizard make it easier and more efficient. During calibration, avoid turning the volume adjustment knob beyond the instrument’s range to prevent piston damage.
Cleaning and Sterilization Procedures
Keeping your micropipette clean and sterilized is crucial for maintaining performance and preventing contamination. This involves both decontamination and cleaning of the lower part of your micropipette.
Sterilizing pipette tips is essential for sensitive applications, with methods available for users to sterilize tips themselves or use those pre-sterilized by manufacturers. Routine disinfecting of pipettes is advised, along with the use of filters and nozzle filters for performance maintenance. UV disinfection can be utilized for surface decontamination.
Choosing Accessories for Your Micropipette
Selecting the right accessories can enhance the functionality and usability of your micropipettes. Some useful accessories to consider include:
- Calibration seal stickers
- Microtube holders
- Pipette stands
- Pipette tips
- Pipette controllers
Each accessory has a role to play in making your task more efficient and accurate. Microplate technology is a game-changer for efficient sample processing and experiments.
But remember, while choosing the right accessory can enhance your experience, it’s your skill and understanding of pipetting that truly make the difference. So, let’s continue honing our skills and exploring the world of micropipettes!
Selecting the Right Tips and Tubes
Just as important as a painter chooses the right brush for their masterpiece, selecting the right tips and tubes for your micropipette is crucial for accurate liquid handling. Using high-quality pipette tips made from premium-grade polypropylene can decrease the chances of air bubble formation.
When selecting tips to read micropipette, ensure compatibility with the pipette model. Opt for tips that are visually clear for monitoring the sample and flexible enough to ensure easy attachment without exerting excessive force.
Utilizing Microplate Technology
Microplate technology is a game-changer for efficient sample processing and experiments. Microplates are commonly used alongside micropipettes to facilitate the simultaneous handling of multiple samples, saving time and increasing efficiency in experiments.
Microplates are available in various formats, including 24-, 96-, and 384-well configurations, catering to different needs. So whether you’re handling tens or hundreds of samples, there’s a microplate that’s just right for you.
Summary of How to Read Micropipette
We’ve explored the world of micropipettes, learning how to read them and understand their volume ranges, displays, processes, and maintenance. We’ve discovered the importance of selecting the right pipette, tips, and tubes, and the advantages of technology. Regular calibration is crucial for maintaining accuracy in all these processes.
Mastering micropipettes is a continuous journey of learning, practicing, and improving. So, keep exploring, keep questioning, and most importantly, keep pipetting!
Frequently Asked Questions for How to Read Micropipette
How to read micropipette P 20?
To learn how to read micropipette especially the P20 micropipette, please note that the top number indicates the tens digit, the middle number indicates the ones digit, and the bottom red number indicates the tenths digit.
What is the p200 setting on a micropipette?
The “P200” setting on a micropipette indicates that the maximum volume is from ml to 200 l, and it is accurate between 20 l and 200 l. This setting is used for measuring volumes within that range.
How are pipettes measured?
Pipettes are measured by reading the value at the bottom of the concave surface of the liquid, known as the meniscus, after drawing the liquid. This ensures accurate measurement and enable the use to discover how to read micropipette.
How can I prevent contamination during pipetting?
To prevent contamination, use a new plastic tip for each sample and dispose of or remove the used tip with the tip ejector.
What is the significance of the first and second stop on the micropipette plunger?
The first stop on the plunger is used for accurate volume, while the second stop ensures complete liquid. These stops play a crucial role in precise pipetting.


