


test results Soil permeability refers to the rate at which soil allows water to flow through it due to its grain structure and void spaces. This article will state how to perform the soil permeability test and help determine whether the soil is right for your intended purpose.
Soil permeability affects how much seepage is underground (or how much could be after precipitation), the stability of retaining structures when subjected to seepage, and more.
Thus, knowing how easily water can travel through the layer structure of a particular patch of soil is important for both agricultural and civil engineering purposes – and even for personal projects like putting a pond in your yard.
This is where the soil permeability test comes in!
Soil permeability tests help you know the rate at which the soil allows water to pass through, hence ensuring the stability and sustainability of your project.
Soil Permeability Test Equipment
This testing equipment includes soil permeability testing equipment such as permeability cells, automated pressure controllers, FlexPanels, Constant/Falling Head Permeameters, Compaction Permeameters, and Shelby Tube Permeameters. Understanding soil testing equipment permeability is crucial for accurate measurements of soil characteristics.
This testing equipment includes:
- Soil Permeameters: Can be used for both constant head and falling head test methods.
- Permeability Test Cell: Holds soil samples during testing.
- Perforated Plates: Sit beneath soil specimens to support the samples and allow permeant liquid to flow through.
- Add-On Master Panel: Used for the simultaneous control and testing of more than one sample.
- Permeability Compaction Hammer: Used to compact soil samples into permeameters.
Methods for Performing the Soil Permeability Test
There are two main ways to perform the soil permeability test – the constant head and falling head methods. Various factors affect soil permeability, such as particle size and shape, specific surface area, void ratio, soil structure, degree of saturation, water properties, temperature, impurities in the water, and organic material.
Permeability testing is crucial for understanding the soil’s ability to transmit water, which is important in engineering and earth sciences. Let’s discuss them in detail.
Constant Head Test Method
The constant head permeability test is best performed on highly granular soils without much sand or silt.
It can yield accurate results even if the sample has been disturbed or reconstituted. This test is used to measure hydraulic conductivity, determining the rate of water flow through the soil.
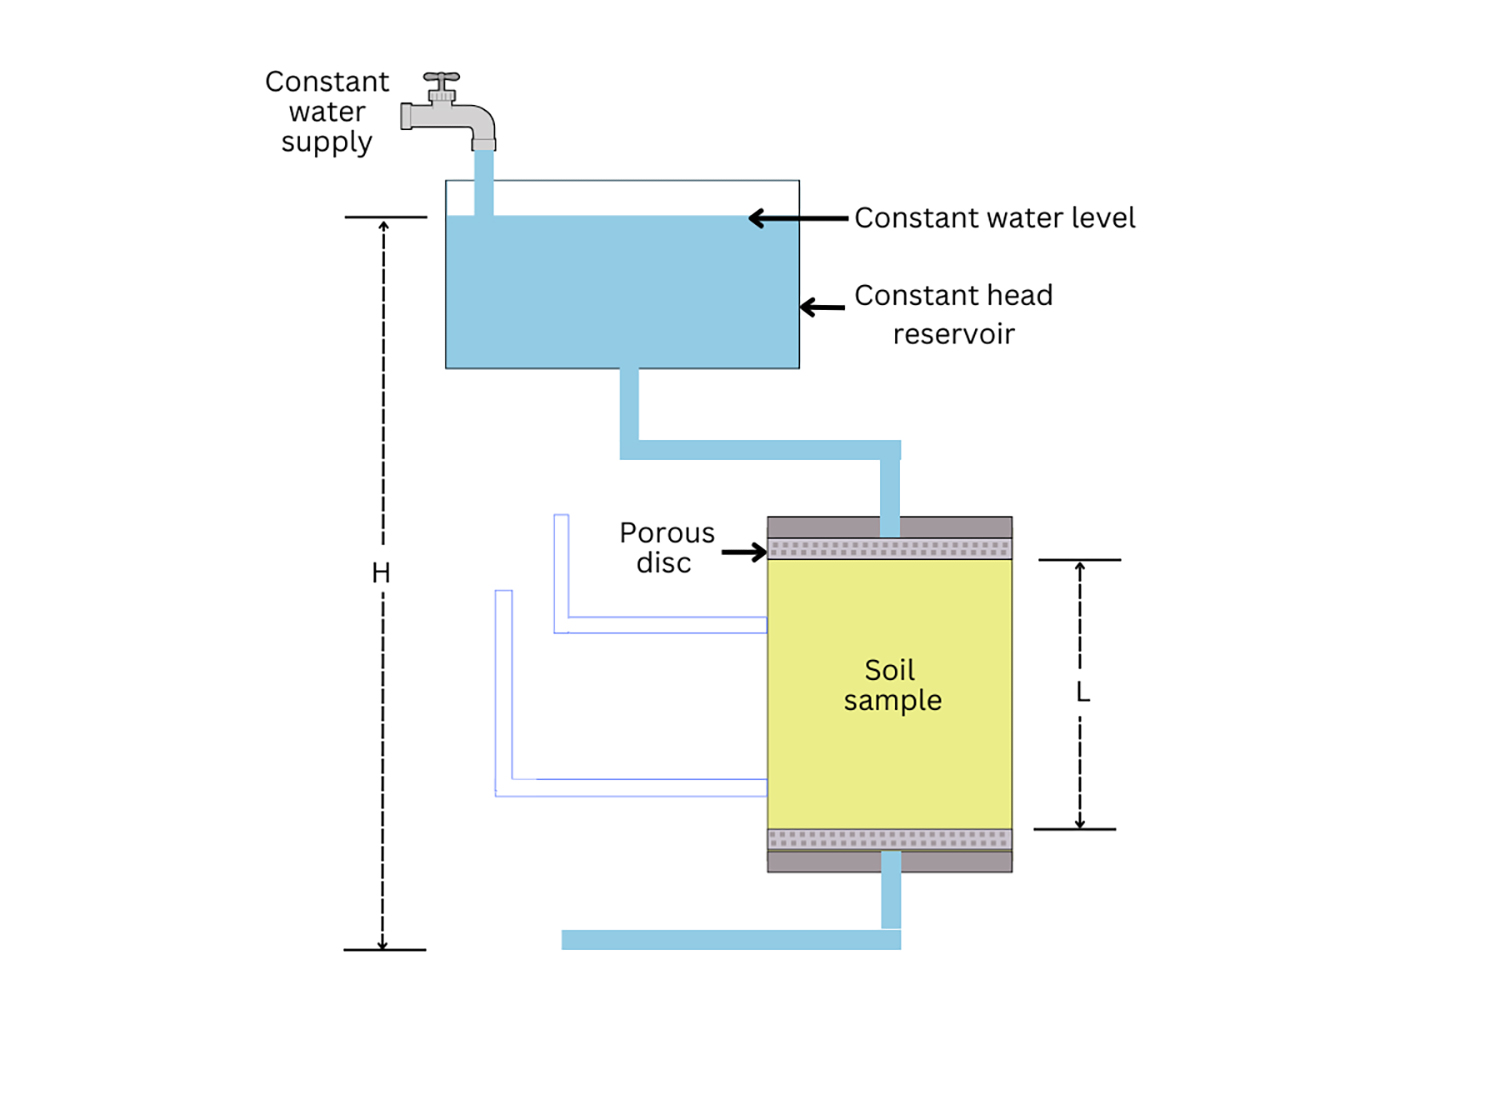
The constant head permeability test is performed using a test apparatus with a reservoir on the top and bottom — one for holding de-aired water and another for holding the water that permeated the soil sample.
Since the constant head method is for granular soils with larger grains, these samples’ hydraulic conductivity will be rather quick. The movement of water through the soil follows Darcy’s Law, describing the flow through a porous medium.
After a set amount of time, the coefficient of permeability can be calculated using the height and cross-section of the soil sample, as well as the pressure measurements and the volume of water that flowed through the sample during the set time interval.
Repeat the test at least three times to find an average coefficient.
Keep Reading: How a Construction Testing Lab Validates Material Quality.
Procedure for Constant Head Permeability Test
The step-by-step testing procedures using the constant head soil permeability test method are as follows:
- Prepare the soil by mixing it with distilled water. Making it wet prevents the particles from segregating during placement in the permeameter.
- Measure the mass of the apparatus, including the porous dish and the reusable filter paper (M1).
- Remove the cap and upper chamber of the permeameter, and measure the inside diameter of the upper and lower chambers. Calculate the average inside diameter (D).
- Place a porous stone in the base of the permeameter, then place a filter paper on the stone.
- Use a scoop to take the prepared soil sample, then place it in the permeameter, filling one-third of the chamber.
- Use a permeability compaction hammer to compact the soil in the chamber of the permeameter. Tamp the soil 10 times and provide a uniform surface.
- Fill two-thirds of the chamber with the soil sample. Tamp 10 times and provide a level surface.
- Pour the last layer of soil into the chamber, filling it to within 2 cm of the top. Tamp 10 times and provide a level surface for the soil permeability test
- Put a filter paper over the soil, and place a porous stone over the filter.
- Then, replace the cap of the chamber. Secure the cap firmly using the cap’s nuts.
- Measure the weight of the apparatus with the soil sample in it.
- Measure the sample length at three to four locations and find the average length (L).
- Make sure the top and bottom valves of the apparatus are closed.
- Connect a pipe from the water tank to the top valve of the apparatus.
- Open the apparatus valves so water saturates the soil sample in it. Allow the water to come out from the bottom valve until you get a steady flow.
- Make sure that the water head in the tank is constant. Allow adequate time for the flow pattern to stabilize.
- Using a stopwatch and a graduated cylinder, measure the time it takes to fill a volume of 750 – 1000 mL. Then, measure the temperature of the water. Repeat this process three times, then compute the average time (t), average volume (Q), and average temperature (T).
- Measure the vertical distance between the water head level in the water tank and the apparatus outflow level (H).
- Then, calculate the permeability using a simple equation.
The soil permeability test results can be calculated using the equation:
KT = QLAtH
Where:
- KT = coefficient of permeability at temperature T
- Q = Volume of water collected
- L = length of the soil sample
- A = Cross-sectional area of the permeameter
- t = Time for collecting water
- H = Hydraulic head difference

Setup for the Constant head soil permeability test method
You May Also Read Soil Permeability Test Method: Precision with Top Humboldt Equipment for Materials Testing.
Falling Head Soil Test Method
The falling head method is better for fine-grained soils like silts and clays and is most accurate when applied to undisturbed samples, considering the soil texture.
Soil survey mapping can also be used to estimate soil permeability through empirical methods.
Instead of using reservoirs, testers perform the falling head permeability test with a standpipe and a relatively small soil sample. They use a small sample size because the hydraulic conductivity is slower due to the closer texture of the clays, silts, or sands being tested. The tester places the soil sample in a container and saturates it with water. Then, they attach it to standpipes filled with de-aired water to a specific level. They also determine a lower water level. Once the water in the standpipe reaches that level, they can calculate the coefficient of permeability using the size of the soil sample, the cross-section of the standpipe, the change in water level, and the time it took to reach that level.
Procedure for the Falling Head Soil Permeability Test
The falling head soil permeability test works like the constant head test. The difference is that the water head will not be constant but will decrease/fall with time.
The step-by-step procedures for the falling head permeability test are as follows:
- Prepare the soil by mixing it with distilled water. The test requires considerable sample preparation.
- Measure the mass of the apparatus, including the porous dish and the reusable filter paper (M1).
- Remove the cap of the chamber and measure the inside diameter of the upper and lower chambers. Calculate the average inside diameter (D).
- Place a porous stone in the base of the permeameter, then place a filter paper on the stone.
- Use a scoop to take the prepared soil sample, then place it in the chamber in three layers. Tamp with a compaction hammer after filling each round and provide a level surface.
- Put a filter paper over the soil, and place a porous stone over the filter.
- Then, replace the cap of the chamber. Secure the cap firmly using the cap’s nuts.


