


Understanding the grain size of soil is pivotal for assessing its suitability for various applications, and sieve analysis of soil is the technique that gets you there. In this no-nonsense guide, we explore how this analysis works, its critical role in different industries, and provide a practical walkthrough of the sieving process. Get ready for a clear-cut journey into the world of soil analysis that prioritizes relevance and usability of data.
Key Takeaways
- Sieve analysis of soil is crucial for determining the particle size distribution in soil, impacting industries such as construction, agriculture, and environmental studies by providing information critical for project stability, crop productivity, and scientific research.
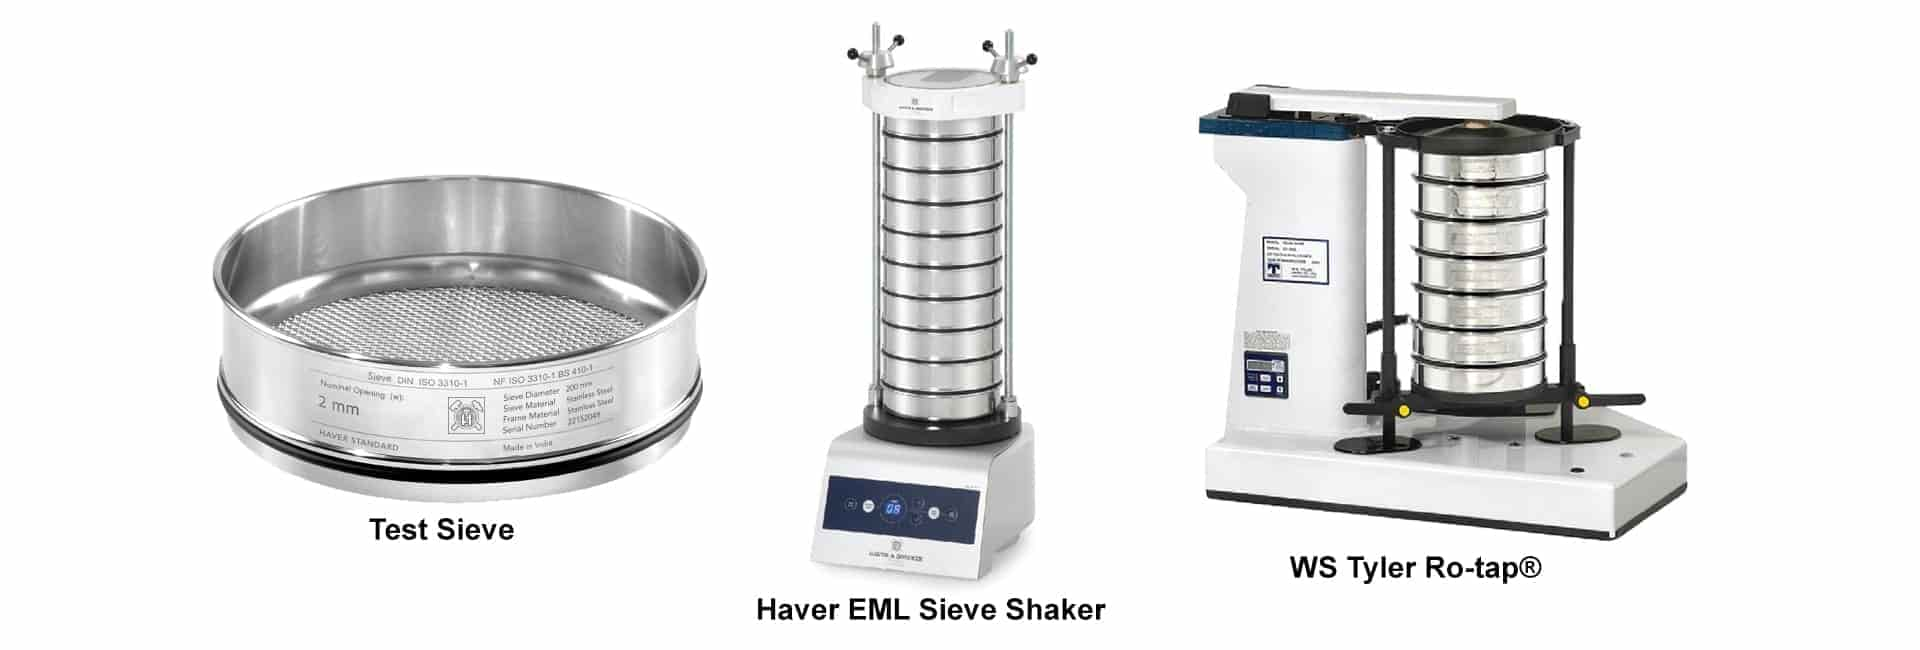
- The accuracy of sieve analysis of soil depends on proper soil sample preparation and the use of correct equipment—including sieve shakers, screens, and accessories—to ensure precise measurement and representation of soil particle distribution.
- Performing and interpreting sieve analysis involves a systematic approach that includes adequate shaking, calculation of results based on mass retained, and the construction of particle size distribution curves to analyze soil properties and suitability for various applications.
The Importance of Sieve Analysis of Soil Testing

Sieve analysis of soil, including wet sieve analysis, is an indispensable tool in soil testing, serving as the gatekeeper for accurate particle size distribution data. Why does this data hold such significance? Well, imagine embarking on a construction project without knowing the characteristics of the soil you’re building on. The consequences could be disastrous, from unstable structures to costly and time-consuming corrections down the line. Sieve analysis helps prevent such scenarios by ensuring that the construction materials adhere to the design and production specifications for the project. It achieves this by analyzing the cumulative percentage of soil retained on each sieve, providing assurance that the materials meet the designated requirements.
Beyond the construction industry, sieve analysis also plays a significant role in agriculture and environmental studies. In agriculture, the grain size distribution of soils is vital for making informed decisions about crop planting and soil management strategies. This test method offers valuable insights into soil properties, which can greatly help in enhancing crop yield and productivity.
For environmental studies, sieve analysis aids in understanding soil characteristics and provides data to support scientific research. By examining the finer fraction of the soil retained on each sieve, researchers can obtain valuable information on the particle size distribution of granular material, thereby significantly supporting environmental studies.
Basics of Sieve Analysis of Soil

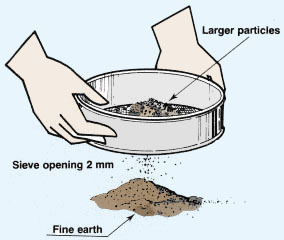
Wondering how sieve analysis achieves this granular insight into soil properties? Well, the fundamental concept underlying sieve analysis is the separation of a sample material based on its particle size. The procedure involves placing the soil sample on a sieving surface of a specific nominal aperture. The soil that is retained on each particular sieve is then analyzed to determine the particle size distribution. Sounds simple, right? But like any scientific process, the devil is in the details.
The accuracy of the process heavily relies on the equipment used. Essential equipment includes:
- Sieve shakers
- Screening tools
- A sieve cover and collection pan
- An ultrasonic sieve cleaner
- A cleaning brush
- A sample splitter
- Glass beads
- Sieving aids
However, it’s not solely about the equipment. Knowing how to use the equipment correctly and understanding the role of sieving accessories is equally important. For example, a sieve cover is placed on top of the sieve to avoid sample loss and ensure result accuracy, whereas the collection pan is used to collect the particles that pass through the sieve. A mechanical shaker is often used to facilitate the sieving process.
Sieve Analysis of Soil Sample Preparation
Before we delve into the sieving process, let’s talk about soil sample preparation. The accuracy of sieve analysis of soil largely depends on the quality of the soil sample used. It starts with creating a representative sample, which ensures accurate grading of aggregates and helps in establishing correlations among properties such as porosity and packing. This, in turn, offers an accurate portrayal of the entire material under analysis.
Preparing the soil sample involves a few key steps:
- Air-drying the sample to eliminate moisture that could disrupt the sieving process and compromise the accuracy of particle size analysis.
- Breaking down any clumps in the soil into smaller particles to facilitate their passage through the sieves.
- Meticulously mixing the soil to ensure uniformity, which is essential for obtaining reliable and precise results from the sieve analysis.
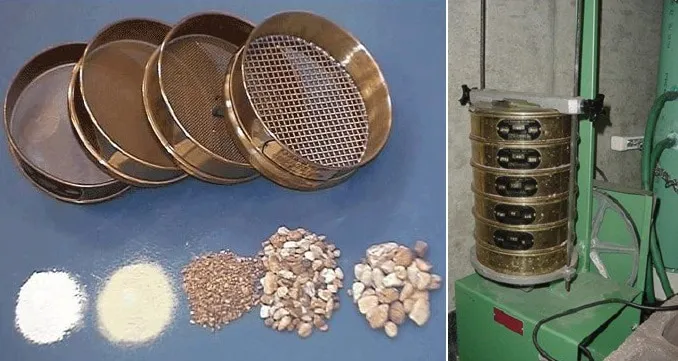
Sieving Equipment and Accessories
With the sample prepared, we can now focus on the main part of the process – the sieving. The most finest sieve equipment commonly used for soil particle size analysis includes ASTM Test Sieves, Sieve Shakers, and Sieve Brushes. These sieves come in a range of standard mesh sizes, determined by ASTM, that cover a range from 125mm to 0.075mm.
In addition to the sieves, certain accessories play a crucial role in sieve analysis of soil. Sieve pans and covers, for instance, prevent sample loss and facilitate the collection and examination of finer materials that have passed through the sieves. Another accessory, the backing of sieve cloth itself, offers necessary reinforcement to fine mesh sieves, especially during wet-sieving procedures, thus preventing deformation and deterioration, ultimately extending the longevity of the sieves.
Performing a Sieve Analysis of Soil

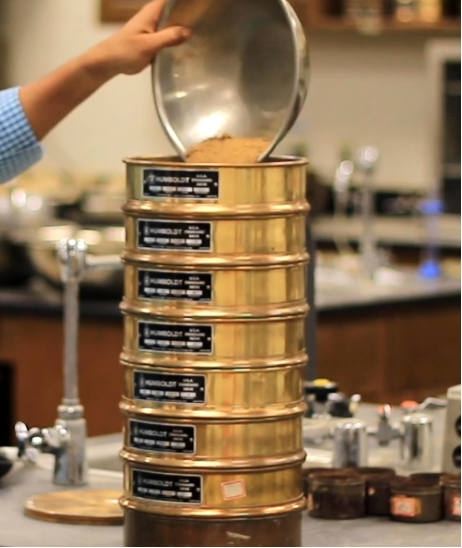
Now that we’ve got the basics covered, let’s dive into the nitty-gritty – performing a sieve analysis of soil. This involves placing the sieve stack in the shaker, pouring the representative sample into the top sieve, arranging the sieves from largest to smallest apertures, and shaking the sample to effectively segregate the soil particles. Sounds straightforward, right? However, it’s more than just shaking and waiting. To ensure the accuracy of the results, it’s crucial to evenly distribute the sample across the top sieve, regularly inspect the sieves for any damage, torn mesh, or deformities, and blend the aggregate before analysis to obtain a consistent sample.
Performing a sieve analysis of soil also involves calculating the results, which is done using the fractional method. Here’s how to calculate the results:
- Divide the mass retained on each sieve by the total mass of the sample.
- Multiply the result by 100 to determine the percent retained.
- Calculate the percent passing by subtracting the percent retained from 100.
- Present the final data as percentages that indicate the weight of the soil passing through the various sieves.
Sieving Process
The sieving process is where the magic happens. The role of a mechanical sieve shaker in this process is to promote particle movement through a stack of sieves, facilitating accurate particle separation. This process can be applied to analyze a wide range of non-organic or organic granular materials, such as sand, crushed rock, and clay.
The soil sample should be shaken in the sieve shaker for a minimum of 10 minutes or until further shaking does not result in noticeable alterations.
Calculations and Interpretations
Once the sieving process is completed, the results need to be calculated and interpreted. The mass of particles retained on each sieve is determined by dividing the mass retained on each sieve by the total mass of the retained soil sample, and then multiplying by 100 to obtain the percentage retained on each sieve. To better understand the distribution of particle sizes, it is useful to calculate the cumulative percentage retained for the soil sample.
However, merely crunching the numbers is insufficient. It’s equally important to interpret the results and understand what they mean. By utilizing the particle-size distribution curves derived from sieve and hydrometer analysis, it is possible to examine the range of particle sizes, enabling deduction of the mechanical properties of the soil and its appropriateness for various construction, agricultural, or environmental uses.
Particle Size Distribution Curves
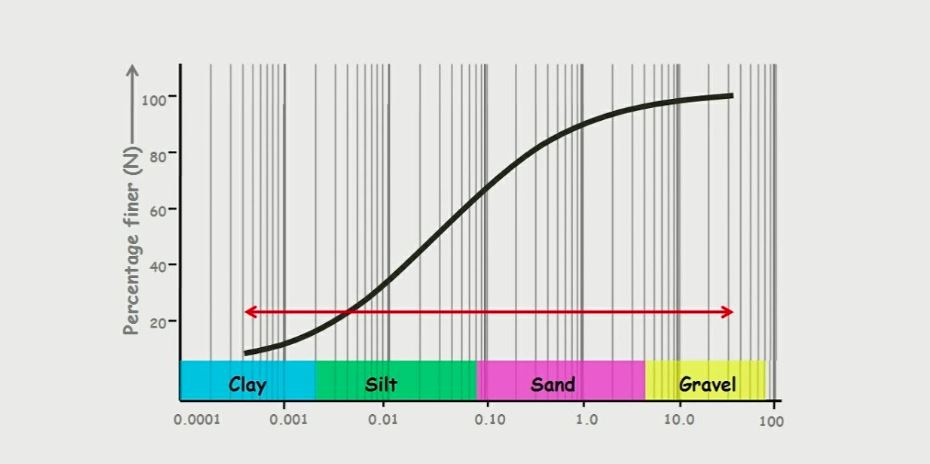

Speaking of particle-size distribution curves, these are a visual representation depicting the average, minimum, and maximum particle sizes, as well as the quantity of material passing through or being retained on each sieve. These curves provide valuable information about the variety of particle sizes present in a soil sample and the distribution pattern of the various particles present. This information can significantly aid in understanding soil properties and making informed decisions in various sectors.
In essence, particle size distribution curves are a graphic summary of the sieve size analysis results. They are constructed by utilizing the percentage finer outcomes obtained from both the coarse and fine-grained components of the soil specimen, positioning them on a semi-logarithmic chart, with sieve sizes on the logarithmic axis and percentage finer on the linear axis.
Plotting and Analyzing Curves
Plotting and analyzing particle size distribution curves isn’t as daunting as it sounds. It involves presenting the results of mechanical analysis in semi-logarithmic plots. Given the importance of these curves, software tools such as:
- GS5
- TransCalc
- CiviLab
- WinSieve
Analyzing a particle size distribution curve can be employed for the purpose of plotting particle size distribution curves.
Why should we put in all this effort? Well, these curves provide valuable insights into soil properties. By interpreting the particle size distribution curves, one can gain a better understanding of the sample’s characteristics and determine the distribution of particle sizes in a soil sample.
Key Parameters: D10, D30, and D60
When it comes to sieve analysis of soil, certain parameters hold more weight than others. Three of these key parameters are:
- D10: the particle diameter at which 10% of the particles are finer from the grain-size distribution curve
- D30: the particle diameter at which 30% of the particles are finer from the grain-size distribution curve
- D60: the particle diameter at which 60% of the particles are finer from the grain-size distribution curve
The D30 value is calculated as the particle diameter at which 30% of the particles are one percent finer from the grain-size distribution curve.
The D60 value is identified by pinpointing the grain diameter where 60% of soil particles are finer and 40% finer particles are coarser. Meanwhile, the D10 value, also referred to as the effective size, signifies that 10% of the soil particles have a smaller diameter. It is a crucial factor in evaluating the distribution and particle size characteristics, representing the size at which the majority of the soil particles are located.
Factors Affecting Sieve Analysis of Soil Accuracy
Despite the reliability of sieve analysis of soil in assessing soil particle size, some factors can influence its accuracy. These include:
- Soil properties like moisture content, particle shape, and soil type
- Moisture can lead to the aggregation of fine particles, making them more challenging to separate accurately
- The sieving technique can also impact the accuracy of a sieve analysis
- Using proper sieving techniques enhances the effectiveness of particle size separation, thereby minimizing potential errors, especially when dealing with particles of various shapes.
The quality of sieving equipment significantly affects the accuracy and consistency of sieve analysis results. Inaccurate separation of soil particles can occur due to poor quality sieves, sieving machines, and related accessories, leading to compromised precision and reliability of the test outcomes.
Comparison of Sieve Analysis of Soil with Other Particle Size Assessment Methods
Sieve analysis of soil is a frequently used method for particle size assessment, but it’s not the sole technique. Other methods include:
- Dynamic image analysis
- Static laser light scattering
- Sedimentation analysis
- Nanoparticle tracking analysis
- Laser diffraction
Each of these methods has its own advantages and limitations.
For instance, while sieve analysis provides the average particle size, the hydrometer method can estimate a range of particle sizes based on settling rates in an aqueous solution. Similarly, laser diffraction can provide more comprehensive data, particularly for spherical or semi-spherical particles, as it directly measures maximum particle size, shape and morphology, potentially leading to higher resolution compared to the average particle size information obtained from sieve analysis.
Applications of Sieve Analysis in Various Industries
Sieve analysis of soil isn’t restricted to laboratories. Its applications span across various industries, each leveraging its capabilities for accurate particle size distribution data. In the construction industry, for instance, sieve analysis plays a crucial role in ascertaining the particle size distribution of materials, like sand and gravel, to verify their compliance with specifications for their designated purpose.
In the realm of agriculture, sieve analysis helps determine soil grain size distribution, which in turn assists in evaluating soil suitability for crops, ultimately contributing to the improvement of yield and productivity. Additionally, in environmental studies, sieve analysis provides data on soil particle size distribution, which is crucial for comprehending diverse soil characteristics and their potential influence on the environment.
Troubleshooting Common Sieve Analysis Issues

As with any scientific process, sieve analysis presents its own set of challenges. These range from overloading the sieve with excessive sample material to improper sampling and particle agglomeration. However, these issues can be addressed by taking into account the shape of the material, refraining from overloading the sieves, utilizing the appropriate sieve diameter, ensuring the use of high-quality sieves, and obtaining a representative sample.
Inadequate soil sample preparation can lead to errors such as particle agglomeration and non-representative samples, which can distort the results. To mitigate this, proper soil mass preparation involves air-drying, crushing, and thorough mixing to create a representative sample, while also ensuring avoidance of any residual material from prior tests.
Summary
In summary, sieve analysis of soil is a crucial tool for understanding the characteristics of soil in various industries. From soil sample preparation to the final interpretation of results, each step in the process plays a significant role in obtaining accurate particle size distribution data. Despite the challenges, with the right techniques, equipment, and understanding of the process, sieve analysis can provide invaluable insights into soil properties. Whether you’re a construction engineer, an agriculturist, or an environmental scientist, mastering sieve analysis can be a game-changer for your work.
Certified MTP has the largest selection of aggregate testing supplies, showcasing industry-leading brands for Sieve Shaker Machines, test sieves, Classification Devices for Aggregate Testing, Sample Splitters and Dividers, and Specific Gravity Test Equipment.
Frequently Asked Questions
What does a sieve analysis of soil tell you?
A sieve analysis of soil provides information about the particle size distribution of a soil sample, helping in the identification of its mechanical properties. These properties determine if the soil can support an engineering structure. It is a traditional method for measuring solid particles ranging in size from 125 mm down to 20 m, providing information on the distribution of aggregate particles within a sample to assess compliance with design and production control requirements.
What is the method of sieve analysis of soil?
The method of sieve analysis of soil involves passing a granular material through a series of progressively smaller mesh size sieves and weighing the material to assess its particle size distribution. This sieve construction is a standard practice in civil engineering and chemical engineering.
How do you prepare soil for sieve analysis?
To prepare dry soil sample for sieve analysis, start by drying the soil samples at 50C in cardboard boxes, and then grind the dried soil in a mechanical mortar and pestle before passing it through a 12-mesh screen to ensure a homogeneous mixture for analysis.
What is the formula for sieve analysis?
To perform a sieve analysis of soil, use the cumulative method by adding each retained fraction, dividing the cumulative mass by the total sample mass, and multiplying by 100 to calculate percent weight retained. Then subtract the cumulative percent retained on a sieve from 100 to find percent passing.
What equipment is required for conducting a sieve analysis of soil?
You will need sieve shakers, screening equipment, a sieve cover and collection pan, ultrasonic sieve cleaner, cleaning brush, sample splitter, glass beads, and sieving aids for conducting a sieve analysis.
View the full line of Aggregate Testing Products and Aggregate Moisture Testing Equipment, especially the popular Aggregate/Sand Moisture Measurement System
Related Blogs for Sieve Analysis of Soil
Sieve Brushes for Efficient Cleaning and Maintenance
Top Scrub Brush for Concrete: Your Ultimate Cleaning Tool
Quality Lab Brushes for Efficient Cleaning and Maintenance
Retsch AS200 Sieve Shaker: Mastering Particle Size Analysis
ASTM C136: Guide to Fine and Coarse Aggregate Sieve Analysis
Sand Sieve Size: A Guide for Optimal Sifting
Sieves for Soil: Finding the Perfect Match for Gardening
Understanding Aggregate Sieve Sizes: A Comprehensive Guide
ASTM Sieve Sizes: A Complete Sizing Chart Breakdown
Graph for Sieve Analysis: A Guide to Accurate Soil Grading
Sieve Test: A Guide to Particle Size Analysis
Top-Quality Sieves for Precise Material Separation
Sieve Mesh Sizes: Guide to Understanding Different Mesh
Sieve Shaker Selection: Find the Model for Material Analysis
The Ultimate Sieve for Compost Mastery: Simplify Your Soil
Sieve Shaker for Sale: Find the Perfect Fit for Your Lab
Sifting with Gilson Sieves: Your Guide to Material Analysis
Gilson Sieve Shaker: Particle Size Analysis
Top Standard Test Sieves for Accurate Material Analysis
Sieve Size Chart: Understanding Mesh and Particle Sizes
Sieve Essentials: Understanding Its Functions & Applications
Using Retsch Lab Sieves and Sieve Shakers for Analysis
What is a Shaker Sieve and Particle Sizing Analysis
Understanding ASTM D 422: Sieve Analysis and Particle Size
Sizes of Sieves: A Comprehensive Guide
Sieve Analysis: A Guide to Grain Size Distribution
Understanding Sieves: A Comprehensive Guide to Test Sieves
Gilson Screens: Discover the Benefits
Selecting Sieve Sizes: Tips for Soil, Sand & Aggregate
Complete Guide to US Sieve Sizes
Gilson Company Testing Equipment: Discover Durability
Gilson Shakers: Precision Screeners & Shaker Screens
Exploring What is Sieving Used For: Applications & Technique


